| Table of Contents |
|---|
Overview
...
| Table of Contents |
|---|
Enabling the credit limit feature within X Dispatch allows a user to import and reference QuickBooks accounts receivable and aging data to easily monitor the line of credit for a specific
...
customer. This tool can ensure that orders are not placed for any
...
customer who is over their credit limit, warn when a
...
customer has reached their credit limit
...
and can keep track of the invoiced and un-invoiced order amounts.
...
| Note |
|---|
|
...
...
|
...
|
...
|
...
|
...
How to Set or Edit Credit
...
Limits Permissions
...
for X Dispatch Users
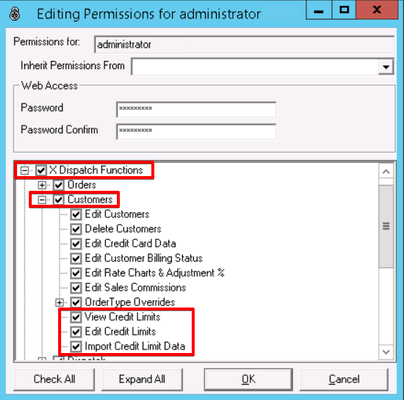
You can set permissions for an X Dispatch user to
...
use the
...
credit limits feature. See Users (Classic Operations App).
- Go to Maintenance > Permissions
...
- .
- Select the user you would like to
...
- set or edit credit limits permissions for.
...
- Click the '+' next to X Dispatch Functions
...
- .
- Click the '+' next to Customers.
- Select which permission you would like to
...
- set for the user
...
- by checking, or unchecking, View Credit Limits, Edit Credit Limits, and/
...
- or Import Credit Limit Data.
- Press OK to save and close the
...
- permission record.
...
How to Enable Credit
...
...
Limits for Customers
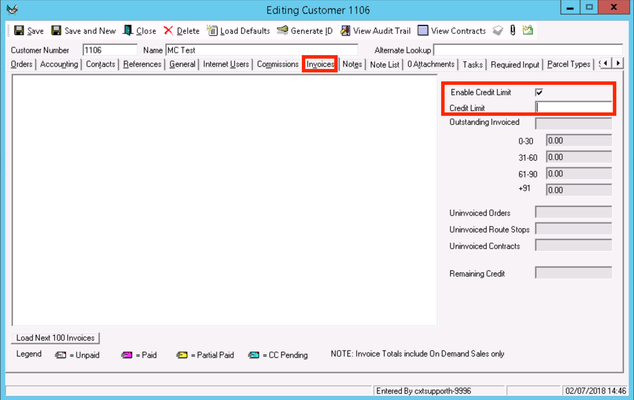
You can set a credit limit on the customer record. See Customers - New/Edit Customer.
- Go to Maintenance > Customers.
- Select and open the customer record you would like to set a credit limit on.
- Go to the Invoices tab.
- Check
- the Enable Credit
- Limit box.
- Enter the Credit Limit
- amount you want to set for
Overview of each field in the Credit Limit window.

- the customer.
- Click the Save button.
Configuring Credit Limit Enforcement
- Open the GlobalOptionsform from the top menu bar.
- From theAccountingtab users can configureX Dispatchnotifications and enforcement of the Credit Limits feature by selecting toIgnore,Warn, orEnforce.
- Users can configure to IgnoreorEnforcefunctionality forX Internet.
- If set toIgnore, all orders can be placed inX Dispatchand X Internet regardless of the Credit Limit that is set on the Customer record.
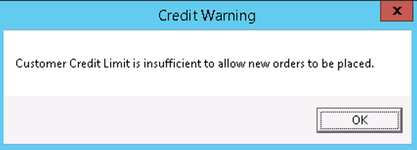
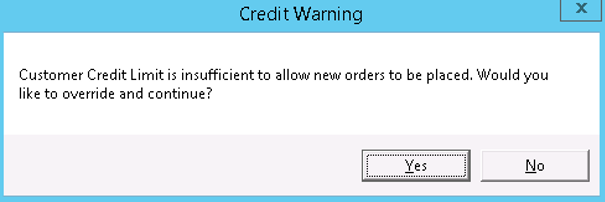
- If set toWarninX Dispatch, the following warning are displayed upon entering the Customer ID when placing any On-Demand order or editing any posted Route Stop.
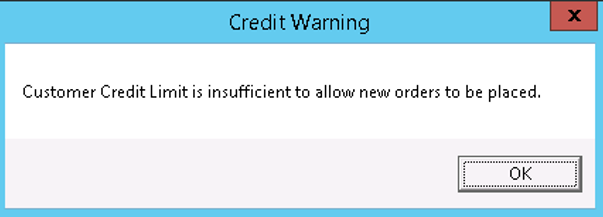
- If set toEnforce in X Dispatch, the following warning are displayed upon selecting the Customer ID.
- If set toEnforce in X Internet, the following warning will appear at the top of the order entry page after selecting the Customer ID.

...
The configuration of credit limits enforcement is done in the global options. See Global Options.
Click the Options button in the toolbar.
Configure Enforcement in X Dispatch and/or X Internet
- Go to the Accounting tab.
- Go to Enforce X Dispatch Credit Limit and/or Enforce X Internet Credit Limit and select how you would like to enforce credit limits. You can choose between:
- Ignore - Any credit limit set on a customer record will be ignored and all orders can be placed.
- Warn - This option is only available for Enforce X Dispatch Credit Limit. A warning will be displayed when entering the Customer ID of a customer with a credit limit when placing an order or editing any posted route stop.
Div 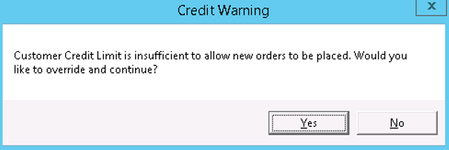
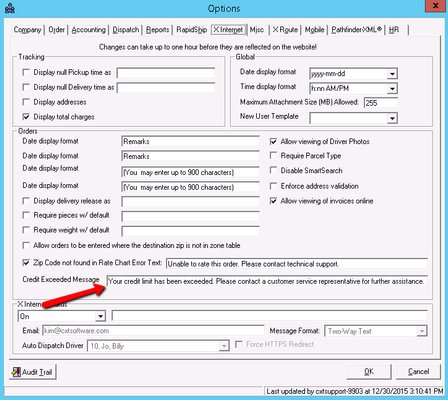
- Enforce - A warning will be displayed when entering the Customer ID of a customer with a credit limit when placing an order or editing any posted route stop. See Configure Internet Credit Exceeded Message for the warning message in X Internet.
Div Info The Warn and Enforce message for all orders placed inside of X Dispatch is set by CXT Software
...
The Credit Exceeded Message for use in X Internet is set by the user. To set the Credit Exceeded Message follow the steps below:
- Navigate to theX Internettab inside of the GlobalOptions form.
- Enter your company's message in theCredit Exceeded Messagefield.
QuickBooks Import
Exporting from QuickBooks
The configuration of the export done in QuickBooks is critical to a successful import into X Dispatch. Once a payment has been applied in QuickBooks to the Customer(s) you are updating in X Dispatch take the following steps to export the file:
- In QuickBooks navigate toReport > Customers & Receivables > AR Aging Detail.
- OpenCustomize report and select on theFilters tab.
- FromFilters select Account.
- From theFilterchoices select Paid Status.
- FromPaid Status click theEitherradio button.
- SelectOKwhich will close the window.
- From the menu select Memorize then enter in a name to save the filter with and clickOK.
- The A/R Aging Detail form is still open, click theExceldrop-down button.
- SelectCreate New Worksheet.
- Export thecomma separated.CSV file with a File Name of your choosing.
Use this memorized report with the set Filters to exporteachtime for use in X Dispatch.
Important Note:These steps are taken from QuickBooks Pro 2015 and may be different with each version.
Importing to X Dispatch
To import a .CSV from a QuickBooks export:
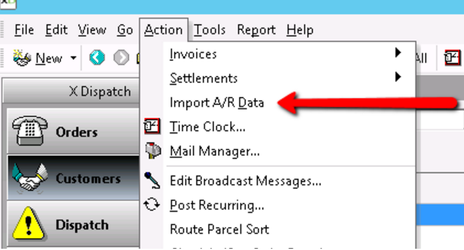
- OpenX Dispatch, click theActionmenu drop-down and selectImport A/R Data.
- Navigate to the location of the file to be imported and selectOpen.
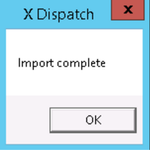
- Once you select Open you will then see an Import Complete popup. ClickOKto close the window.
The newly imported A/R data will then be queued to be updated according to the specific interval set in the Credit CalculationsX Stream Definition.
Once theX Stream Definitionis run, the Outstanding Invoiced aging data is updated inside the Customer record.
Update A/R QuickBooks data as often as possible to keep the X Dispatch Customer records up to date.
For assistance updating the X Dispatch queue interval, please contact Customer Support.
Troubleshooting
...
and cannot be changed,
- Click OK or continue to the steps below to configure the internet credit exceeded message.
Anchor creditExceededMessage creditExceededMessage
Configure Internet Credit Exceeded Message
| creditExceededMessage | |
| creditExceededMessage |
- Go to the Internet Options tab.
- In the Orders section under Credit Exceeded Message, enter the text you would like to display.
- Click OK.