| Info |
|---|
ROWS requires an X Stream License. Please contact your account manager or technical support for more information. |
...
- Fully setup customer record(s).
Create the internet user for the customer record(s). See Internet Users (Classic Operations App) for more information.
Div - Check the following boxes:
- Approved
- Allow Accessorial Charges
- Select other options as needed.
- Check the following boxes:
Create a human resource record. See Human Resources - New / Edit Human Resource for more information.
divOn "Misc" tab:
Enter the following data in the "UserData" fields:
Div - UserData1: Internet user's "User ID" from the recipient's system that the orders will be created under.
- UserData2: Internet user's password from the recipient's system.
- UserData3: ServiceTypeID from recipient's system that will be used when placing the order. Enter a 0 if no service type will be used. See Service Types (Classic Operations App) for more information.
UserData4: Order type ID from the recipient's system.
Note Only one order type per human resource / driver is permitted. For multiple order types, create additional human resources.
- UserData5: ROWS URL (for originator customer): https://<domain>/rows.rows.asmx

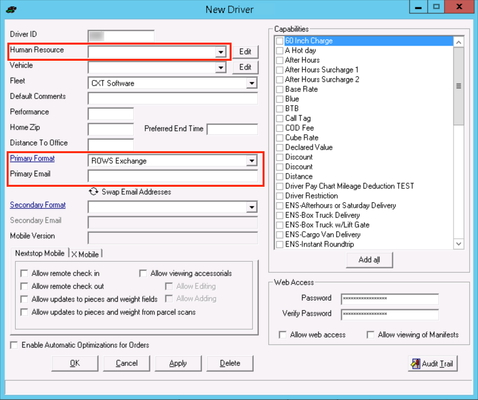
Create a driver record. See Drivers (Classic Operations App)- NClaw / Edisic Driver for more information.
divSet up the following:
- Human Resources: Select the human resource created in the previous step.
- Primary Format: Select "ROWS Exchange".
- Primary Email: Enter the ROWS URL from the recipient's system. https://<domain>/rows.rows.asmx@ROWS For cloud customers, <domain> would be <CXTID>.cxtsoftware.net, where <CXTID> is the 4 digit CXT customer id. For example, if the CXT customer id is 9999, this would be https://9999.cxtsoftware.net/rows/rows.asmx@ROWS
| Note |
|---|
A human resource / driver record must be created for each order type that the recipient's system will carry out. |
...
- Fully setup customer record(s).
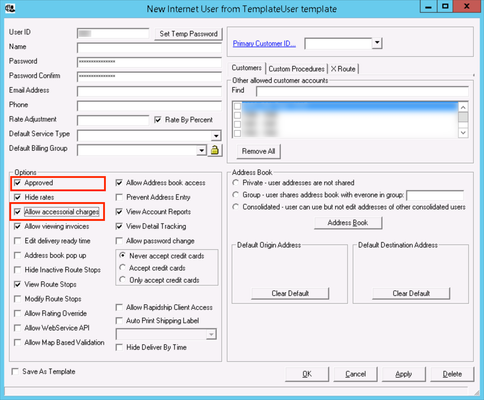
Create the internet user for the customer record(s). See Internet Users (Classic Operations App) for more information.
Div - Check the following boxes:
- Approved
- Allow Accessorial Charges
- Select other options as needed.
- Check the following boxes:
Create or modify the following message formats: I believe these are included in the baseline database, so they may/should exist for the customer depending on their version of XD.
div- ROWS Delivery (Order - Delivered)
- Set "Message Type" to "Customer - On Demand".
- Format date as "ddd mm/dd/yy h:nn AM/PM".
- Check the "Execute SQL Statement" box on the Advanced tab.
Enter the following SQL on the Advanced tab for each ROWS message format:
Paste code macro EXEC spQueueRowsStatusSend @OrderID=[OrderID]
ROWS Pickup (Order - Picked Up)
- Set "Message Type" to "Customer - On Demand".
- Format date as "ddd mm/dd/yy h:nn AM/PM".
Check the "Execute SQL Statement" box on the Advanced tab.
Enter the following SQL on the Advanced tab for each ROWS message format:
Paste code macro EXEC spQueueRowsStatusSend @OrderID=[OrderID]
ROWS Confirmation (Order - Status Update)
- Set "Message Type" to "Customer - On Demand".
- Format date as "ddd mm/dd/yy h:nn AM/PM".
Check the "Execute SQL Statement" box on the Advanced tab.
Enter the following SQL on the Advanced tab for each ROWS message format:
Paste code macro EXEC spQueueRowsStatusSend @OrderID=[OrderID]
See Message Formats (Classic Operations App) for more information.
- ROWS Delivery (Order - Delivered)
Attach the message formats to the customer record where orders are received from the originator.
div
| Note | ||
|---|---|---|
See Order Types (Classic Operations App) for more information. |
...