| Anchor | ||||
|---|---|---|---|---|
|
| Table of Contents | ||
|---|---|---|
|
...
| Excerpt | ||||
|---|---|---|---|---|
|

...
| Info |
|---|
For X Dispatch 21.0 or newer, alerts set up here will be displayed as an Email notification when order is option in the Rapidship Place Order page. For example, the Status Event "Order - Delivered" must be set up here for "Delivered" to be an option for Email notification when order is. |
| Field Name | Description |
|---|---|
| Status Event | Select an event of an order to trigger the email notification to be sent to the email address in the "Email / Fax Alerts" field. |
Message Format | Select the message format for the notification that will be sent. |
| Required | Check if the status event is required. |
| UpdatedBy | The last user to update the alert set up. |
| UpdatedWhen | The timestamp of when the alert was updated last. |
| Edit | Click to edit the message format. |
...
| Field Name | Description |
|---|---|
| Business Unit | Select the business unit that the customer belongs to. Business units are configured in Maintenance > Business Units. See Using Business Units for more information. |
| Customer Type | Select the customer type. Example: Medical Supplier, Auto Parts Distributor. Customer types are configured in Maintenance > Customer Types. See Customer Types for more information. |
| Customer Source | Select the customer source. Example: How you obtained the "Customer", Advertisement, Cold Call, etc. Customer sources are configured in Maintenance > Customer Sources. See Customer Sources for more information. |
User Field 1 | Allows you to keep track of any data you would like. These fields accept any type of data. |
| User Field 2 | |
| Ensenda Courier ID | Provided by Ensenda for their customers. |
| Ensenda Merchant | Provided by Ensenda for their customers. |
| Ensenda URL | Provided by Ensenda for their customers. |
| Customer Since | By default, this is the date the customer file was created. This date can be changed. |
| Last Ordered | Date that the customer placed their last order. |
| First Ordered | Date that the customer placed their first order. This cannot be changed. |
| First Entered | Date the customer file was created. This cannot be changed. |
| First Entered By | User who created the customer file. This cannot be changed. |
| Last Updated | Date the customer file was last updated. This cannot be changed. |
| Last Updated By | User who made the last update to the customer file. This cannot be changed. |
| Override The Default Signature Text in X Mobile | Overrides the signature text in X Mobile when capturing a signature. |
| Driver Notes | Enter notes to display to the driver in X Mobile when [DriverNotes] is added to the message formats. |
| Route Stop User Field Captions | Text entered into the User Field will modify the caption of the corresponding User Field of the customer's route stop record. |
...
| Field Name | Description | ||
|---|---|---|---|
| User ID | Alphanumeric username the internet user uses to log in. | ||
| Name | Internet user's name. This can be alphanumeric and is displayed when logged in. | ||
| Internet user's email address. | |||
| Phone | Internet user's phone number. | ||
| Hide Rates | Whether or not rates are hidden for the internet user.
| ||
| Approved | Whether or not the internet user is approved to log in to Rapidship or X Internet. | ||
Base Rate Adj % | Internet user's Rate Adjustment which is specific to the internet user.
| ||
| Addresses | Number of addresses in the internet user's address book. | ||
| AccountKey | The customer record's Alternate Lookup. | ||
AllowDriverTracking(XI)
| Whether or not the internet user is allowed to track drivers on X Internet. This does not include tracking drivers in Rapidship. | ||
| Display Driver Location |
Setting for whether or not driver location is displayed for all of the customer's internet users.
| ||
...
The Required Driver Input allows you to enter prompts for drivers in Nextstop Mobile when at a stop. See Nextstop 3 Required Driver Input for more information.
...
| Section / Field | Description | ||||||||||||
|---|---|---|---|---|---|---|---|---|---|---|---|---|---|
| Available Parcel Types | Select the parcel types that are specific to the customer by checking the checkbox in front of the parcel type or click the Add all button to check all the boxes. You can edit the parcel types list in Maintenance > Parcel Types. See Parcel Types for more information.
| ||||||||||||
| Enable parcel type list in XD |
When enabled is checked, all of the orders, route stops, contract stops, and parcel forms associated with the customer in X Dispatch will only accept the selected parcel types. | ||||||||||||
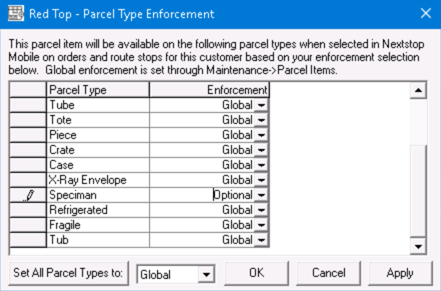
| Available Parcel Items |
Configure parcel items and parcel type enforcement for drivers to select in Nextstop. See Parcel Items. The checkbox must be checked to enable parcel item options in Nextstop for Available Parcel Types selected.Click the corresponding button in the Parcel Type Enforcement column to edit the parcel item's enforcement type.
| ||||||||||||
| Required Mobile Route Parcel Types | Configure required parcel types during driver action for specific stop types by selecting the Parcel Type and Stop Type. The Parcel Type cannot be duplicated.
|
...