| Anchor | ||||
|---|---|---|---|---|
|
...
How to Add a New Customer
| Excerpt | ||
|---|---|---|
|

How to Edit a Customer
Go to Maintenance > Customers.
Double click on the customer you would like to edit.
How to Delete a Customer
Go to Maintenance > Customers.
Double click on the customer you would like to delete.
Click the Delete button.
Form
...
Fields | Description |
|---|---|
Customer Name | Unique number ID for the customer. |
Name | Customer name. This will appear on orders, invoices, etc. It does not have to be unique and can be changed later. |
Alternate Lookup | Alternate lookup ID for the customer. This field will only appear after the Customer Number is entered and Enable Alternate Lookup is enabled in the Global Options Misc tab. |
...
Field Names | Description |
|---|---|
Base | Enter the number of the base chart you would like to assign the customer. |
Rate Adjustment % | This is a discount or increase of the base chart. Enter a positive number for an increase, or a negative number for a discount. Example: Enter "- 20" for a 20% discount off the rate chart assigned. |
Apply to base rate only | When enabled, the Rate Adjustment % to only apply to the base rate. When disabled, the Rate Adjustment % will be applied to base and item rates only. Surcharges are not included in the rate adjustment. |
Order Type Overrides | Click the button to override order type settings on a customer by customer basis. You can override time parameters by extending time frames on order types, give discounts or increases for a certain time, and change the distance factor calculation. 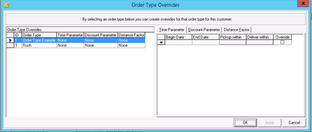 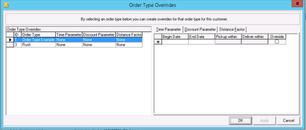 |
Driver Override % | Enter the total driver pay percent for on demand work. This will override the driver pay percent in the driver's HR record. |
Exclude from sales reports ( House Account ) | Check the box if you would like the revenue from this customer not appear in the generated reports. This is useful in situations where a customer account is set up to charge back your company for various deliveries, House Accounts. |
Tax Exempt | Check the box to exclude the customer from sales tax. |
Require verification before | Check the box to require verification on an order before the selected action.
|
Print invoice detail format | Check the box to print invoices according to the format selected. Three different formats are provided by default:
You can set up additional formats. |
Email invoice detail format | Check the box to email invoices to the email in the “Billing Contact” section and select a format.
|
Account Status | Select from the following:
|
Billing Cycle | Select how often the customer will be invoiced. You can add more billing cycle options. See How to Invoice a Customer Outside of the Normal Billing Cycle. |
Create a separate invoice for each order | Check the box to bill and invoice each order placed by the customer separately. The invoice number will be the same as the order ID. |
Invoice due in [ _ ] days | Enter a number. This number can be used on invoices and can be imported into your accounting package. |


...
Field Name | Description |
|---|---|
Business Unit | Select the business unit that the customer belongs to. Business units are configured in Maintenance > Business Units. See Using Business Units for more information. |
Customer Type | Select the customer type. Example: Medical Supplier, Auto Parts Distributor. Customer types are configured in Maintenance > Customer Types. See Customer Types (Classic Operations App) for more information. |
Customer Source | Select the customer source. Example: How you obtained the "Customer", Advertisement, Cold Call, etc. Customer sources are configured in Maintenance > Customer Sources. See Customer Sources (Classic Operations App) for more information. |
User Field 1 | Allows you to keep track of any data you would like. These fields accept any type of data. |
User Field 2 | |
Ensenda Courier ID | Provided by Ensenda for their customers. |
Ensenda Merchant | Provided by Ensenda for their customers. |
Ensenda URL | Provided by Ensenda for their customers. |
Customer Since | By default, this is the date the customer file was created. This date can be changed. |
Last Ordered | Date that the customer placed their last order. |
First Ordered | Date that the customer placed their first order. This cannot be changed. |
First Entered | Date the customer file was created. This cannot be changed. |
First Entered By | User who created the customer file. This cannot be changed. |
Last Updated | Date the customer file was last updated. This cannot be changed. |
Last Updated By | User who made the last update to the customer file. This cannot be changed. |
Override The Default Signature Text in X Mobile | Overrides the signature text in X Mobile when capturing a signature. |
Driver Notes | Enter notes to display to the driver in X Mobile when [DriverNotes] is added to the message formats. |
Route Stop User Field Captions | Text entered into the User Field will modify the caption of the corresponding User Field of the customer's route stop record. |
...
Field Name | Description | ||
|---|---|---|---|
User ID | Alphanumeric username the internet user uses to log in. | ||
Name | Internet user's name. This can be alphanumeric and is displayed when logged in. | ||
Internet user's email address. | |||
Phone | Internet user's phone number. | ||
Hide Rates | Whether or not rates are hidden for the internet user.
| ||
Approved | Whether or not the internet user is approved to log in to the Client Portal or X Internet. | ||
Base Rate Adj % | Internet user's Rate Adjustment which is specific to the internet user.
| ||
Addresses | Number of addresses in the internet user's address book. | ||
AccountKey | The customer record's Alternate Lookup. | ||
AllowDriverTracking(XI) | Whether or not the internet user is allowed to track drivers on X Internet. This does not include tracking drivers in the Client Portal. | ||
Display Driver Location | Setting for whether or not driver location is displayed for all of the customer's internet users.
| ||
...
The Note List tab displays notes for the customer.
...
How to Add a Note
Click the "Add Note" button.
Click the arrow down under Type to select the note type. Note types can be configured in Maintenance > Note Types. See Note Types (Classic Operations App) for more information.
Click the Note section to add your note.
Go to File > Save when done.
How to Edit a Note
Click the Type or Note field of the note you want to edit.
How to Delete a Note
Click the box on the left of the note you would like to delete to highlight the entire row.
Press the delete key on your keyboard.
Attachments
The Attachments tab lists any files that have been attached to the customer.
...
How to Delete an Attachment
Right-click on the attachment you want to delete.
Click on "Delete Attachment".
...
Tasks
The Tasks tab allows you to create tasks related to the customer.
...
Field Name | Description |
|---|---|
Task Name | The name of the task created. |
Due Date | Date and time the task is due. |
Created By | Name of the user that created the task. |
How to Create a Task
Right-click anywhere in the Tasks tab to display the menu.
Click on "New".

Fill in the "Edit Task" form
...

You can set a timed reminder for the task and receive an alert you when it is almost due. When a "Reminder" is set, the "Edit Task" window will automatically appear at the time that the "Reminder" is set.
Click "OK" to save.
How to View a Task
Double click the task name of the task you want to view.
How to Delete a Task
Right click on the task you want to delete to display the menu.
Click "Delete".
...
Required Driver Input
The Required Driver Input allows you to enter prompts for drivers in the Driver App when at a stop. See Driver App Required Driver Input for more information.
...
| Page Properties | ||
|---|---|---|
| ||
|