Requires X Dispatch 18.0 or newer.
Geofencing in X Dispatch allows users to set a geofence radius in miles for drivers, customers, order types, business units, or globally, that can raise an alert to the driver and attach status codes to the order or stop to indicate the status update occurred outside of the geofence. See Nextstop 2 Geofencing or Nextstop 3 Geofencing for more information on how geofencing works in Nextstop.
- Geofencing rules only apply to customers that have the "Outside Geofence" status code enabled.
- Users must have the "Geofencing" permission under the "Maintenance Functions" enabled to view this section. See Users (Desktop Operations App) for how to add a new permission.

To access Geofencing, go to Maintenance > Geofencing.

| Field | Description |
|---|---|
| ID | Geofencing ID that is auto-assigned. |
| Type |
|
| Type ID | ID number for the corresponding "Type". Not available if the "Type" is set to "Global". |
| Type Name | Name associated with type and ID. |
| Geofence Radius (miles) | Distance in miles allowed before geofencing alerts and status codes are enabled. Fractions of miles are accepted values (0.5, 0.25, etc.). |
| Cached GPS Grace Time (Minutes) | Grace time in minutes that GPS data will be cached. The default value is 0. Max time allowed is 60 minutes. See How to Set Up a GPS Grace Time for Nextstop 2 or How to Set Up a GPS Grace Time for Nextstop 3. Requires X Dispatch 18.1 or newer. |
| Priority | Priority level when there are overlapping criteria. If 2 priority values are the same, the lowest "Geofence Radius (miles)" value will be used. Example: Different Priority
A driver is picking up an order for a customer, and two different Geofencing configurations apply. The applicable settings differ in "Geofence Radius (miles)" and "Priority". Since the driver has "Priority" set to 1 and the customer a "Priority" of 2, the "Geofence Radius (miles)" set for the driver will be used. Example: Same Priority
A driver is picking up an order for a customer and multiple different Geofencing settings apply, with differing "Geofence Radius (miles)" and the same "Priority" level. Since the driver "Geofence Radius (miles)" is set to "1" and the customer has it set to "5", the "Geofence Radius (miles)" set for the driver will be used. |


How to Add a New Geofencing Rule
For X Dispatch 19.2 or Older
Before you can use using geofencing, you must create a new status code in X Dispatch with the description "Outside Geofence" and enable the status for the customers who will be using this feature. If the "Outside Geofence" status code is not created, there will be no record that the driver was outside the geofence radius.
- Enter "OutsideGeo" as the Exception ID.
Enter "Outside Geofence" as the Description.
The description must match exactly.
Select "Both" as the Exception Type.
If you would like to enable geofencing for all customers, on the main Status Codes page click the green
 icon in the Enable All Customers column. If you would only like specific customers to be able to use geofencing, see Enable Geofencing for Specific Customers below.
See Status Codes (Desktop Operations App) for more information.
![]() button.
button. Alternate Steps

How to Edit a Geofencing Rule
- Go to Maintenance > Geofencing.
Click the geofencing rule you would like to edit or right-click the row and select Edit.
The right-click menu option Open in New Window will open the edit form in a window that can be moved around.
How to Delete a Geofencing Rule
- Go to Maintenance > Geofencing.
Click the geofencing rule you would like to delete.
Click the
 button.
Section Functions
You can customize which columns you would like to view and arrange the order by clicking the Edit Grid Layout icon Requires X Dispatch 19.1 or newer. You can switch between a table view and a card view by clicking on the Card View icon Requires X Dispatch 21.0 or newer. You can zoom in or out of Next Dispatch pages in X Dispatch by right clicking on the page (other than on a card or table) and selecting Zoom In or Zoom Out, or use the Ctrl + or Ctrl - keys. Use the checkbox at the beginning of each row, or at the top of each card, to select multiple records. Quick Tip No more than 2 windows can be open or edited at a time. Right click on a row or card to view right click menu options.Customize Grid Layout
![]() .
. Change View
![]() or Table View icon
or Table View icon ![]() .
.Zooming Settings
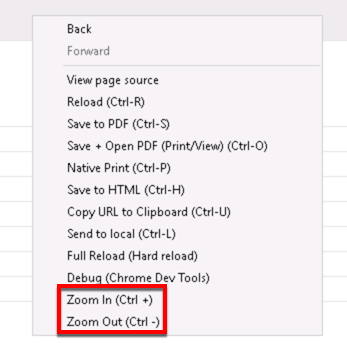
Select
Right Click Menu
"Outside Geofence" Status Code
Geofencing uses the "Outside Geofence" status code. See Status Codes (Desktop Operations App) for more information.
"Outside Geofence" in Rapidship
When Internet Display is enabled, Rapidship users can see the status code in the Track Order and Route Tracking sections of Rapidship. See Track Order and/or Route Tracking.

Example of Outside Geofence Status Code in Track Order
