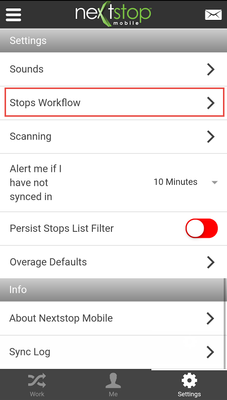
- Sounds
- Stops Workflow
- Scanning
- Alert me if I have not synced in..
- Persist Stops List Filter
- Overage Defaults
- About Nextstop Mobile
- Sync Log
This article reviews how to use the options within the Settings tab. The Settings tab is the third tab at the bottom right of the Nextstop Mobile (NSM) Home/Work screen. The Settings tab displays a variety of options that allow the mobile user to customize how NSM looks and behaves.
Any change to settings using the Pull-out Menu is temporary, and resets to the default at log out. The pull-out Menu settings are meant to temporarily toggle on or off to make navigation quick and easy for the mobile user. Logging out of the device resets those temporary settings to the default settings. Changes made from the Settings menu located at the bottom right of the screen (with the exception of Persist Stops List Filter, which is always a temporary setting) are saved to X Dispatch and persist even after a logout.
Sounds
The Sounds section of Settings allows mobile users to set a default voice and hear sample sounds in that voice. There is an option "None" that disables all audio sound during the current login session.
How to set a default voice:
From the Home/Work screen select Settings from the bottom right corner of the screen.

- From the Sounds screen, the Voice banner at the top of the screen displays the name of the current voice selected. Click the drop-down menu and select a voice, either Mike, Joe, or None. If Mike or Joe is selected that selection plays an audio voice sample. All of the audio clips listed below the voice banner default to the voice selected. If None is selected, all audio sounds are disabled on the Sounds screen during the current login session.
Click the Settings button at the bottom right side of the screen to return to the Settings screen.


When None is selected all audio clips are disabled on the Sounds screen and no sound notifications are heard. This selection is not recommended since you will no longer receive sound notifications for new orders.


Stops Workflow
The Stops Workflow section of the Settings menu allows a mobile user to configure how the Stops List is displayed. Customizing these settings is detailed in the following article: Nextstop Mobile Stops Workflow.
Scanning
NSM works in conjunction with Bluetooth barcode scanners utilizing the Human Interface Device, HID, technology. This section of the article reviews enabling Bluetooth scanning from the Settings menu only. To enabling HID Scanning from the pull-out Menu see Nextstop Mobile Workflows.
- Best practices for using HID scanning is to pair your Bluetooth scanner BEFORE enabling HID scanning in NSM. Enabling HID scanning without a Bluetooth scanner already paired results in the keyboard appearing any time the app is expecting input.
- To pair a Bluetooth scanner to your mobile device, please refer to your mobile device or Bluetooth scanner's instruction manual on how to pair with an Android or iOS device in HID mode.
- Enabling HID Scanning from the pull-out Menu is a temporary, session only, setting, which is not saved upon logout. Enabling HID scanning from the Settings tab, located at the bottom right of the Home/Work screen, saves that setting to X Dispatch and persists that setting for all future login sessions.
How to enable parcel scanning using a Bluetooth scanner from the Settings menu:
- Pair your Bluetooth scanner to your device.
- Navigate to the Settings tab at the bottom right of the Home/Work screen.
Select Scanning.

- Select Enable HID Scanning to toggle the switch from red (off) to green (on).
- Set the Prefix and Suffix if you have set your Bluetooth device to something different than the default in NSM.
- Bluetooth scanning devices typically add a prefix and suffix to a scan to indicate the start and end of a scan. Please refer to your scanner's owner's manual to determine what the prefix and suffix are for your device.
Once HID scanning is enabled use the Bluetooth device to scan your parcels.


Alert me if I have not synced in..
If your device is out of cellular range or not connected to Wi-Fi it is unable to sync any data to the server. The Settings menu has a configurable menu that syncs according to a defined time period. If a sync has not occurred within that set time period, a banner is displayed at the top of all screens in the application to notify you that the app has not synced. Once the device has successfully synced, the warning banner disappears. If the warning message is displayed and you are in cellular range you can pull down on any screen to sync.
How to set Alert me if I have not synced in
From the Settings tab located on the bottom right of the screen, select Alert me if I have not synced in.

A Minute interval menu is displayed, once a selection is made, the menu closes.
If Never is selected, the warning banner does not display and you are never notified if there is a sync issue.
The new time selected is displayed next to the Alert me if I have not synced in.


Persist Stops List Filter
Applying a filter on the Stops List to display On-Demand or Route Stops is a temporary setting and resets each time you navigate away from the Stops List. Users are able to lock a selected Filter Option on the Stops List screen using the Persist Stops List Filter. Using the Persist Stops List Filter locks the selected Filter Option while navigating around the app and persists after the user logs out. Additionally, changing the Filter Option while Persists Stops List Filter is enabled will save/persist the new filter.
How to lock a Filter Option on the Stops List screen using the Persist Stops List Filter
- From the Stops List screen select Open filter.
Select the Select Filter Option drop-down menu.


The filter options are displayed with the default setting of None selected, once a selection is made, the menu closes. The selection is displayed on the Stops List.


- To lock the selection so that it persists when navigating around the application, navigate to Settings located at the bottom right of the Home/Work screen.
Toggle the Persist Stops List Filter option to on (green).


- From the Settings screen, select Work located on the bottom left of the Home/Work screen.
From the Home/Work screen select Stops List.


- From the Stops List screen, an icon is displayed next to the Stops List title indicating that a filter is set. The filter selection is displayed below the Open filter menu, above the stops.
To verify the current selection is adhering to the Persist Stops List Filter, select Open filter, a lock is displayed next to Select Filter Option.


Overage Defaults
When scanning overage parcels in NSM, you must provide basic details about the parcel by setting Overage Defaults. Once the Overage Defaults are set, they persist until logout. Overage Defaults can be changed at any time by navigating to the Overage Defaults section. There are four ways to navigate to Overage Defaults. To learn more about the multiple locations where Overage Defaults are set see: Nextstop Mobile - Home.
How to set the Overage Defaults from the Settings screen:
From the Settings screen, select Overage Defaults.

- From the Overage Defaults screen, select a Parcel Type from the drop-down list of available parcel types. The Parcel Type is a required field, once selected the Save button becomes enabled for selection and the remaining fields are optional.
- Enter the weight of the parcel in the Weight field.
- Enter the height of the parcel in the Height field.
- Enter the width of the parcel in the Width field.
- Enter the length of the parcel in the Length field.
- Select the Save button in the bottom-right corner.
You are returned to the Settings screen.


About Nextstop Mobile
The About screen displays the current Version of NSM running on the device and the Licenses information for all third-party licenses used by NSM. The About section in NSM is for informational purposes only.
How to view the current Version of NSM:
- From the Settings screen, select About Nextstop Mobile.
On the About page, the current Version is displayed.


How to view Licenses utilized by NSM:
- From the About screen, select Licenses.
The Licenses screen displays third-party licenses that NSM utilizes. Clicking any License opens it in a web browser. Click the back button on your device to return to NSM.


Sync Log
The Sync Log displays all the times that NSM synced with X Dispatch since the application was launched. The Sync Log only displays syncs for the current login session and refreshes with each new login.
How to view the current session's Sync Log:
From the Settings screen, select Sync Log.

The Sync Log screen is displayed with a log of all the syncs that have occurred since logging in. All successful syncs are listed with a white border, date and what was synced. All failed syncs are listed with a red border, date, and what failed to sync.

