...
...
| Info |
|---|
Operations App is continuously updating and page layouts may differ. See here for other versions. You must have the Drivers permission to view and the Edit Drivers permission to edit enabled. See Users (Desktop Operations App). |
...
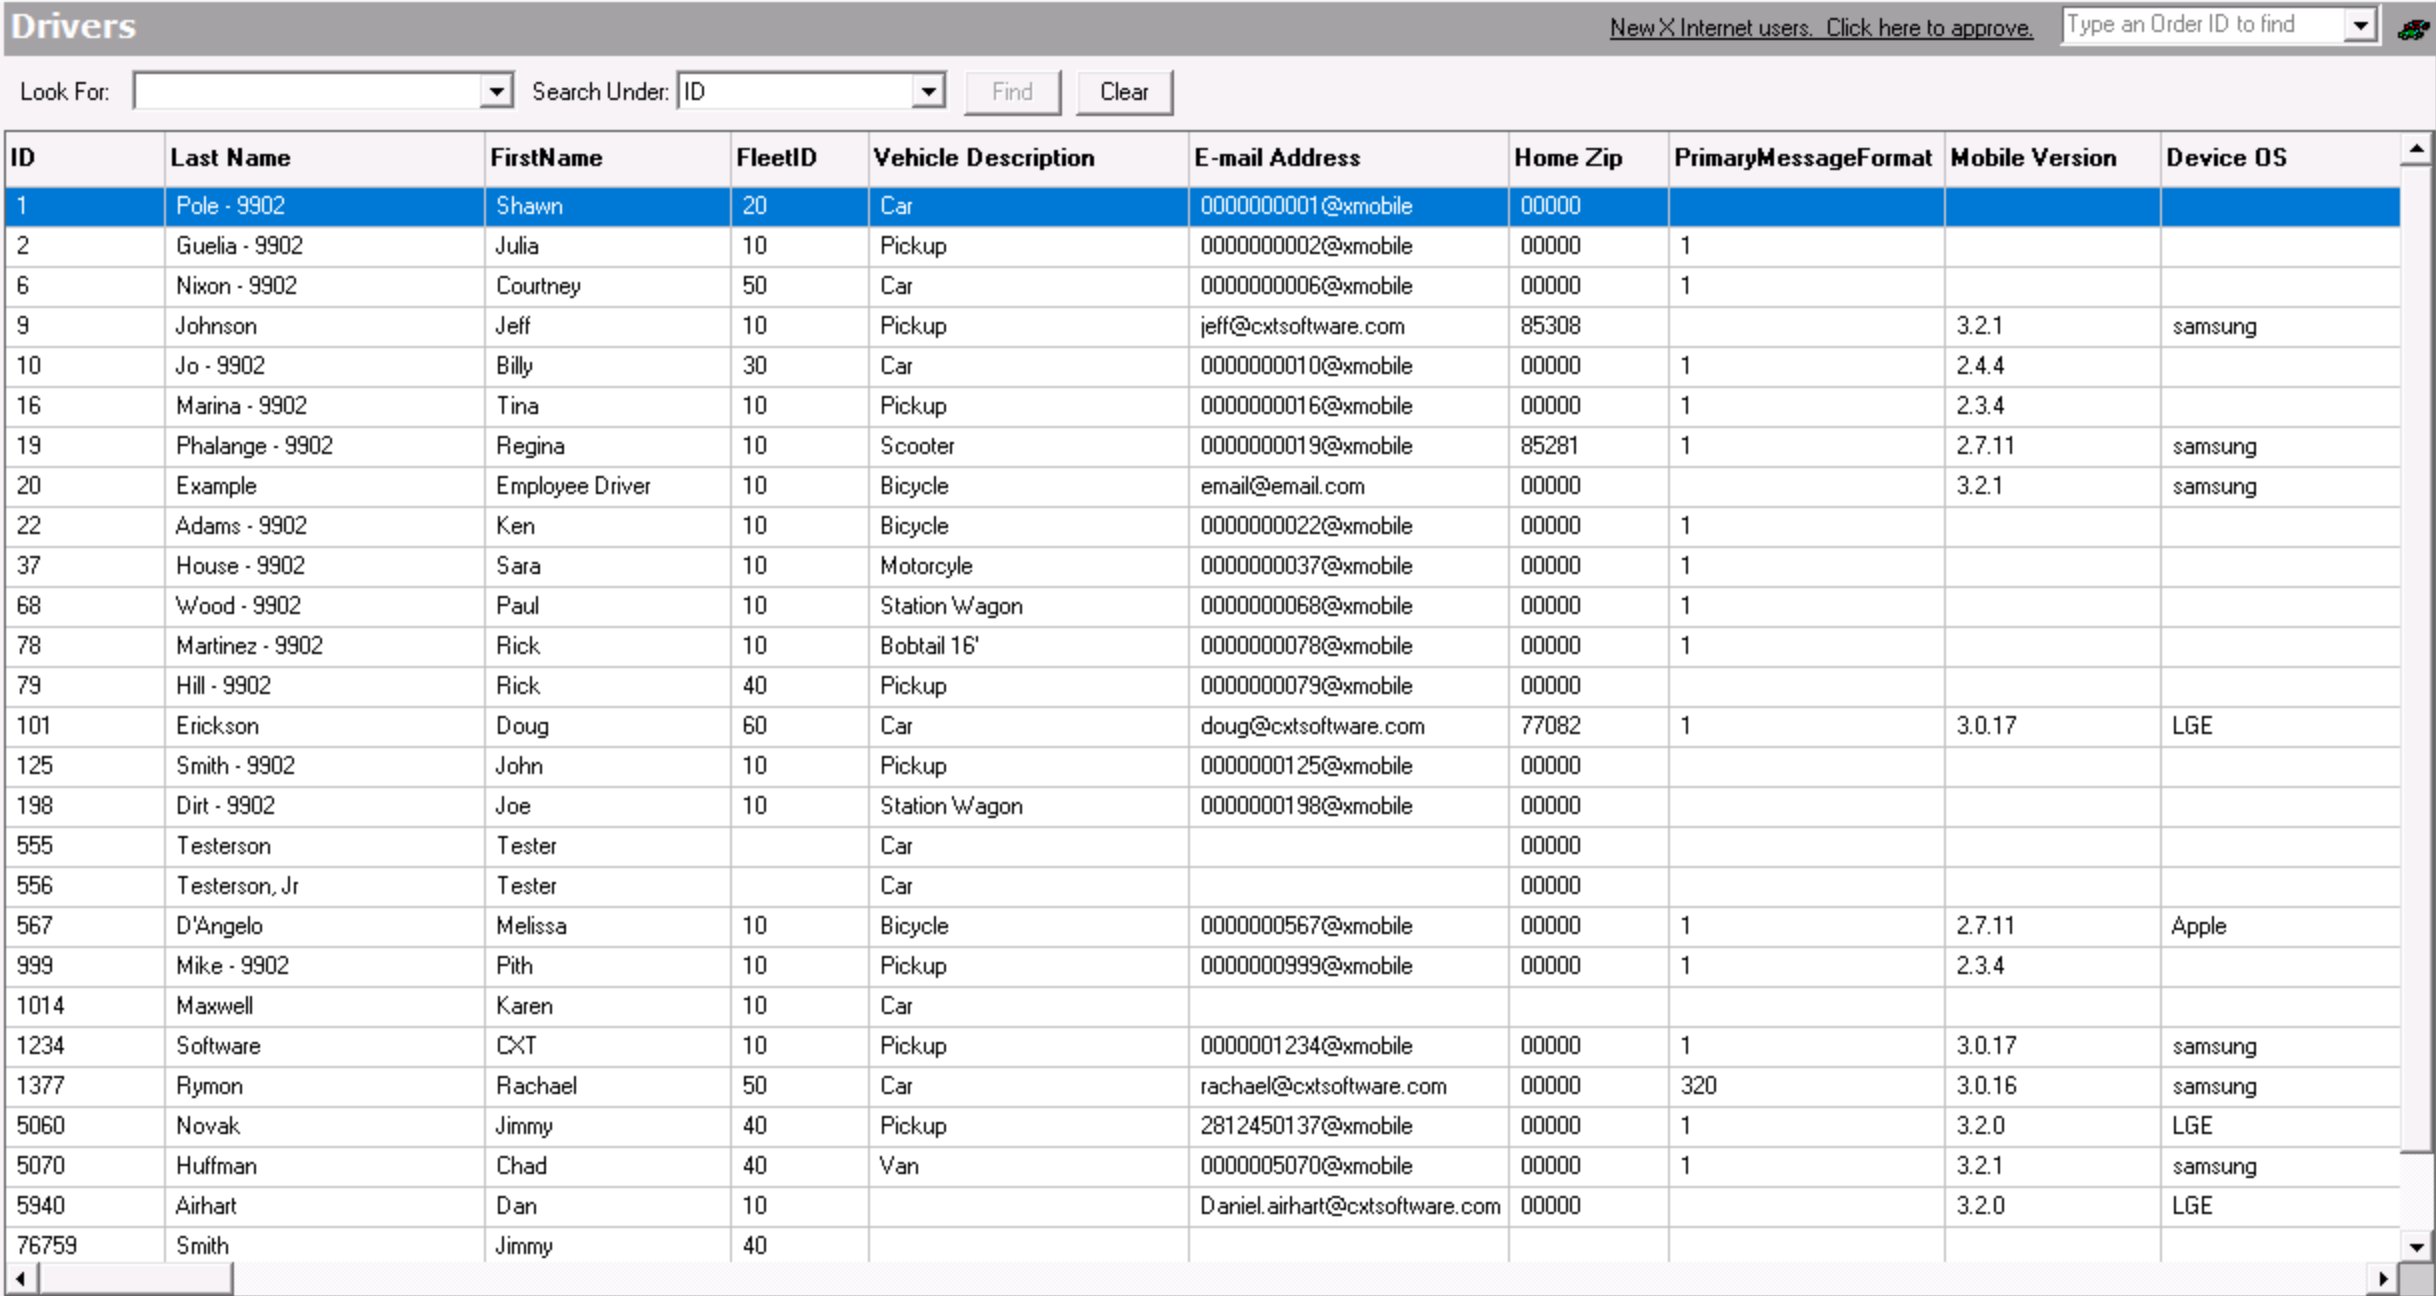
The Drivers section in X Dispatch is where you can view, add, or edit driver records.
To view Drivers, go to Maintenance > Drivers.
| Info |
|---|
In X Dispatch 18.0 or newer, the driver's "Device OS", "Device Model" and "Device OS Version" will be displayed. |
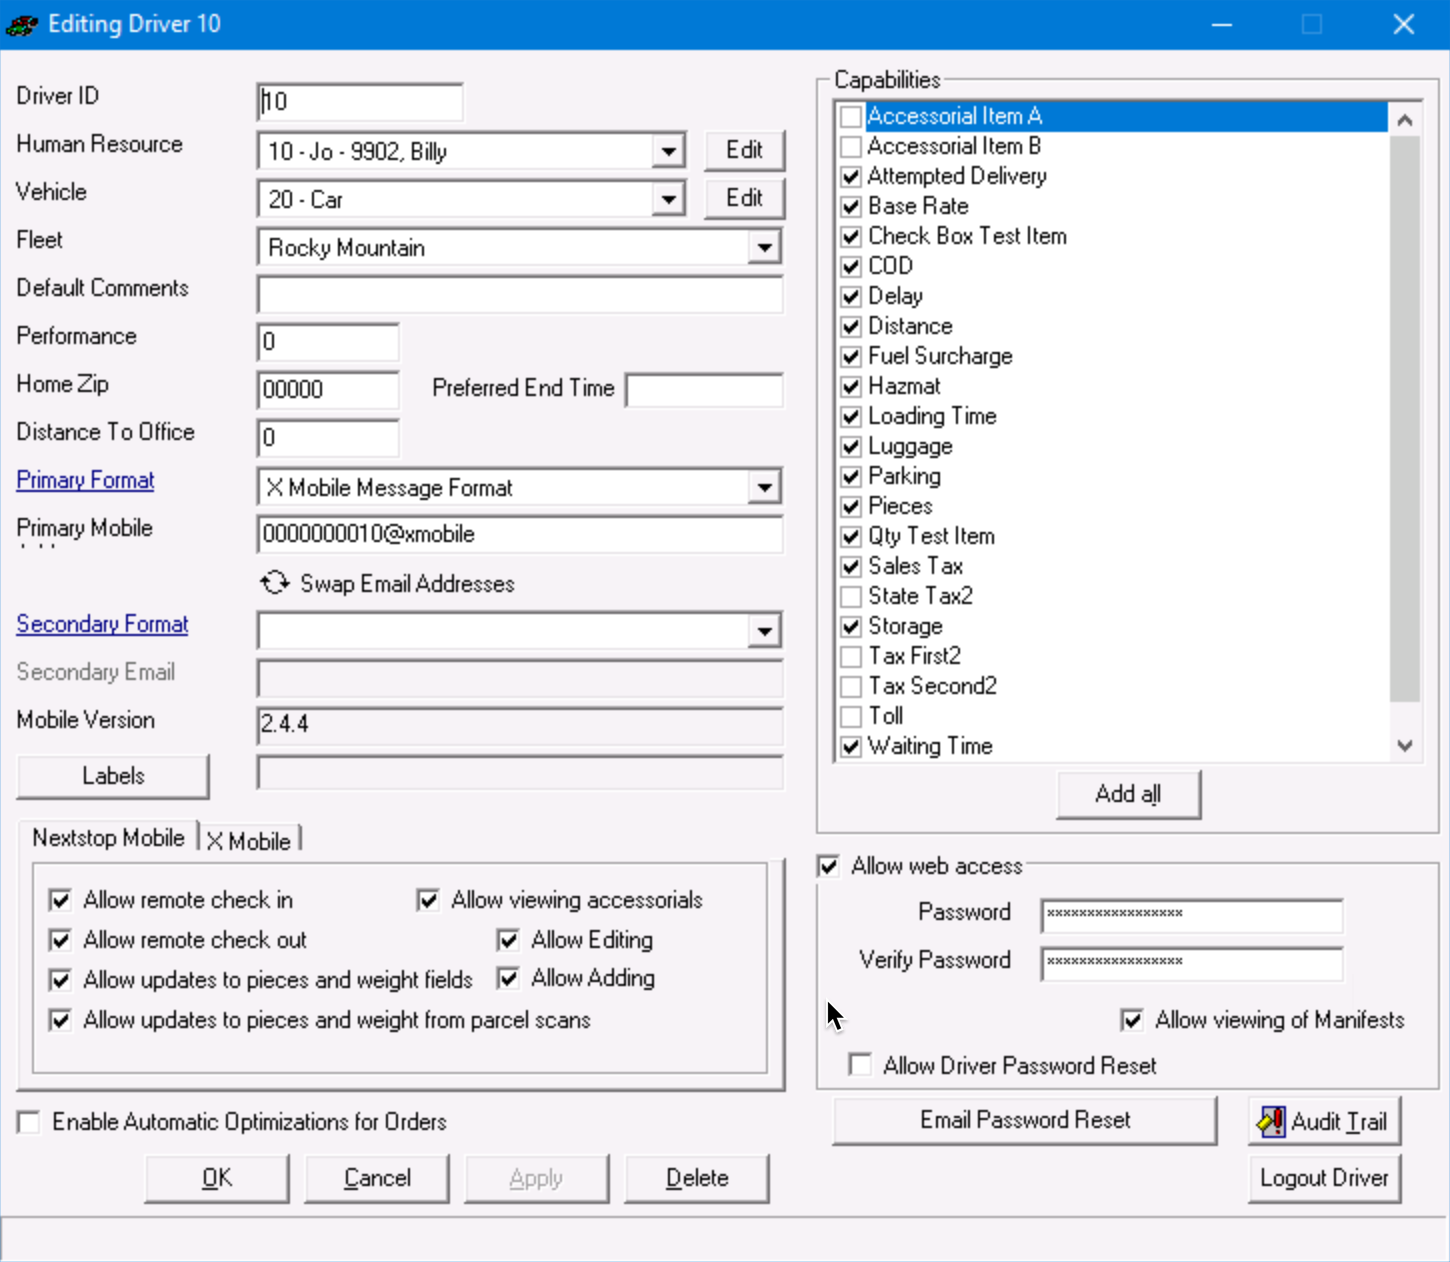
How to Add a New Driver
| Excerpt |
|---|
Alternate steps:
|

...
- Go to Maintenance > Drivers.
- Click Double-click the driver you would like to edit or right-click the row and select Edit. info
The right-click menu option Open in New Window will open the edit form in a window that can be moved around.
How to Delete a Driver
- Go to Maintenance > Drivers.
- Click Double-click the driver you would like to delete.
- Click the delete button
 . the Delete button at the bottom of the form.
How to View the Driver Audit Log
To view changes that have been made to this driver record, click the Audit Log button ![]() at Trail button at the bottom of the driver form.
at Trail button at the bottom of the driver form.
Section Functions
...
Driver Form
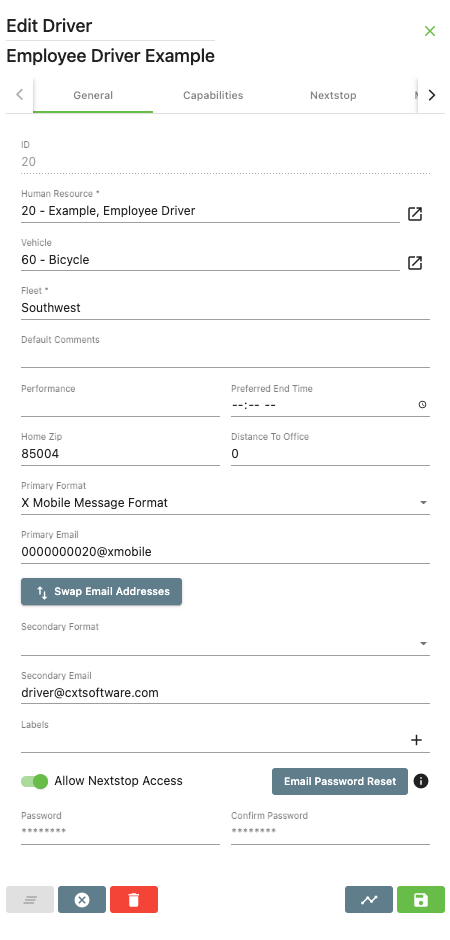
General
The General tab holds the general information about the driver.
| Field Name | Description | ||
|---|---|---|---|
| Driver ID | Driver ID number entered when creating a new driver. | ||
| Human Resource | Human Resource ID and name, or business name if available, for the human resource record associated with the driver. Use the Edit icon to to button to view or edit the human resource record. See Human Resources - New / Edit Human Resource.
| ||
| Vehicle | Vehicle ID and description for the driver. Use the Edit icon button to view or edit the vehicle. See Vehicles. | ||
| Fleet | The driver's assigned fleet. See Fleets. | ||
| Default Comments | Text entered here will show in the "Comments" column on the dispatch board. | ||
| Performance | Performance score. See Driver Ranking Configuration. | ||
| Home Zip | Zip code for the driver's starting location. | ||
| Preferred End Time | The driver's preferred end time for the day.Home Zip | Zip code for the driver's starting location. | |
| Distance to Office | The distance between the office and where the driver starts each day. | Primary Format | Primary message format that the driver is using when receiving orders and/or messages to their email or device. See Message Formats. |
| Primary Email | For Nextstop or X Mobile notifications, the format XXXXXXXXXX@xmobile, where the "XXXXXXXX" is a unique 10 digit number. If you are using this field for .
For emails only, and not Nextstop or X Mobile notifications, the primary email address for the driver. | ||
| Swap Email Addresses | Click this button to swap the Primary Email with the Secondary Email. | ||
| Secondary Format | Secondary message format that will be used with the "Secondary Email"
| ||
| Primary Format | Primary message format that the driver is using when receiving orders and/or messages to their email or device. See Message Formats. | ||
| Secondary Email An email address to be used as a backup.
| |||
| Labels | Label(s) to be used for reporting purposes. See Labels. | ||
| Allow Nextstop Access | When toggled on, the driver is able to log in to the Nextstop with the ID and Password. | Email Password Reset |
| Note |
|---|
The Primary Email or Secondary Email field must have a valid email address for this button to be clickable. |
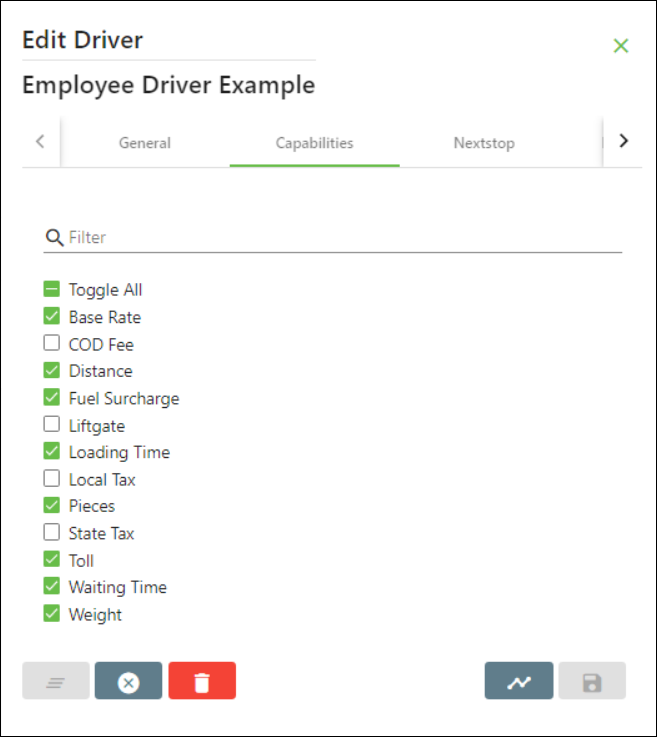
Capabilities
The Capabilities tab lists the driver capabilities, or items a driver is able to handle on an order. Use the Filter search to easily find driver capabilities, or click Toggle All to check or uncheck all driver capabilities. Capabilities can be added or edited in the Items section.
| Note |
|---|
Global options setting for capabilities under the "Dispatch" tab must be set to warn or enforce for this section to actively restrict orders based on these settings. See Global Options. |
| Tip | ||
|---|---|---|
| ||
Capabilities can be added to all drivers by going to Actions > Dispatch Capabilities from the main X Dispatch menu. |
Nextstop
The Nextstop tab holds information and permissions for the driver's Nextstop usage.
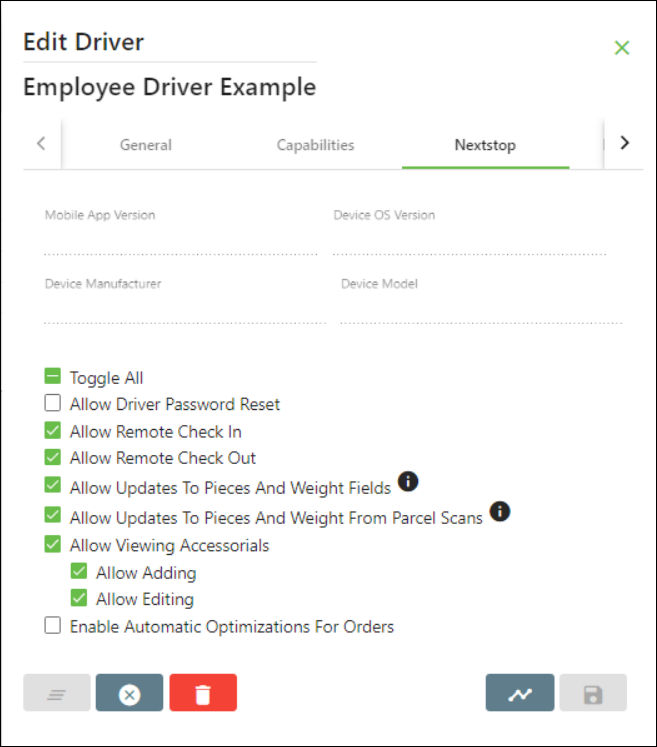
| Field Name | Description | |||||||||
|---|---|---|---|---|---|---|---|---|---|---|
| Mobile App Version | The version of Nextstop that the driver used last. | |||||||||
| Device Manufacturer | The manufacturer of the device the driver used last. | |||||||||
| Device OS Version | The OS version of the device the driver used last. | |||||||||
| Device Model | The model number of the device the driver used last. | |||||||||
Toggle All | Check or uncheck to enable or disable all settings on this list. | |||||||||
| Allow Driver Password Reset | Allow the driver to request a password reset link to be sent to the Primary driver's email address from Nextstop. | |||||||||
| Allow remote check-Another email address in case there is an issue with the "Primary Email". | ||||||||||
| Secondary Format | Secondary message format that will be used with the "Secondary Email". See Message Formats. | |||||||||
| Mobile Version | The version of Nextstop or X Mobile on the driver's device. | |||||||||
| Labels | ||||||||||
| Nextstop Mobile Tab | ||||||||||
| Allow remote check in | Allow the driver to remotely check in to dispatch board for dispatching. | |||||||||
| Allow remote check out | Allow the driver to remotely check out of dispatch board for dispatching.
| |||||||||
| Allow updates to pieces and weight fields |
Allows drivers to manually update the order or stop-level pieces and weight fields in Nextstop. | |||||||||
| Allow updates to pieces and weight from parcel scans |
Allows the driver's parcel scans in Nextstop to update the order or stop-level pieces and weight fields based on the Global Options > Mobile tab permission. See Global Options. | Allow Viewing |||||||||
| X Mobile | ||||||||||
| Allow remote check in | Allow the driver to remotely check in to the dispatch board for dispatching. | |||||||||
| Allow remote check out | Allow the driver to remotely check out of the dispatch board for dispatching.
| |||||||||
| Allow add/edit Accessorials | Allow the driver to add and /or edit accessorial items in NextstopX Mobile. | |||||||||
| Enable Automatic Optimizations for Orders | When checked,
Enables automatic re-optimization when a significant event is detected for a driver's on | -demand orders | is enabled. See Route Optimization.
| -
| ||||||
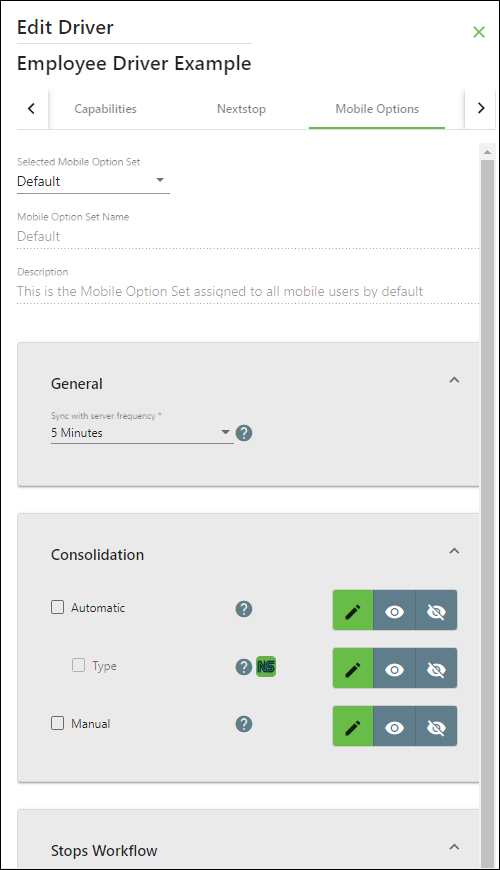
Mobile Options
The Mobile Options tab displays the mobile options for the driver. Hover over the question mark or see Mobile Option Sets Definition for descriptions of the mobile option.
RO Services
The RO Services tab holds assisted dispatch settings for the driver.
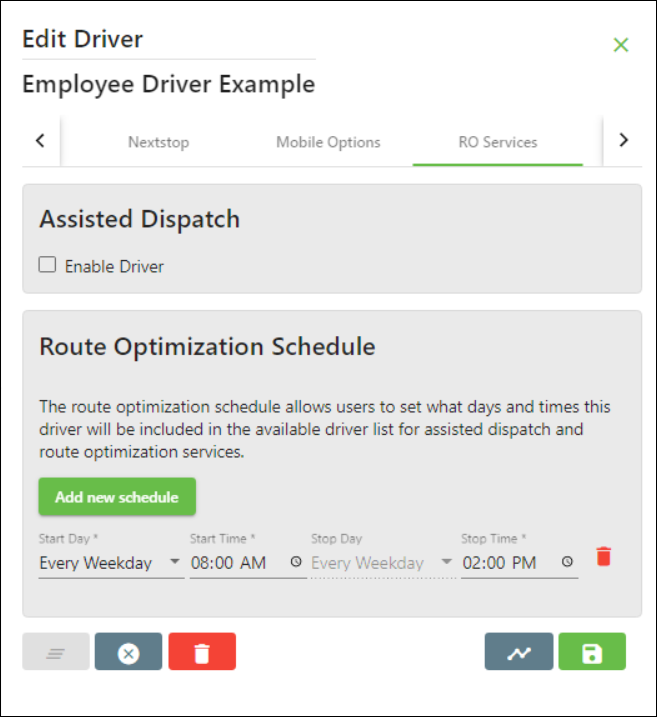
Assisted Dispatch
When checked, the driver will be included in assisted dispatch functionality that suggests the best driver for on demand orders based on the On Demand RO Service settings in the Global Route Optimization Config.
Route Optimization Schedule
The set days and times the driver will be included in the available driver list for assisted dispatch and route optimization services. Click the Add new schedule button to add a schedule, and the delete button next to the schedule to delete it.
...
| |||
| Capabilities | Drivers capabilities of which items a driver is able to handle on an order. Use the "Add all" button to add all capabilities to the driver.
| ||
| Web Access | |||
| Allow Web Access | Allow access to the web portal and Nextstop. | ||
| Password | Driver's password. | ||
| Verify Password | Verify the driver's password. | ||
| Allow Viewing of Manifests | Allow the driver to view manifests when logged in to the web portal. | ||
| Allow Driver Password Reset |
Allow the driver to request a password reset link to be sent to the Primary driver's email address from Nextstop. | ||
| Email Password Reset |
Click this button to email a password reset link to the driver's Secondary Email. | ||
| Audit Trail | View the audit trail to see changes made to the driver form. | ||
| Logout Driver |
Remotely log out the driver from Nextstop. | ||