Add Custom Shipping Labels to X Internet
- Michelle Cabaya (Unlicensed)
This app is deprecated. Please see Client Portal for the current app version.
X Internet has the ability to be updated with customized shipping labels. Customized labels must be quoted and created by CXT Software Engineering before they can be installed and utilized.
The X Internet server can be updated to include these labels in the list that displays when the "Print Shipping Labels" link is accessed after an X Internet order is entered. Follow these instructions to add labels to the displayed list.
X Dispatch Hosted Customers - The time for these X Internet modifications is included in the custom shipping label quote, thus these instructions will not need to be followed. They are to be used only for on premise customers.
Step-by-step guide
Identify shipping labels to be loaded by opening X Dispatch. Go to: Maintenance -> Custom Procedures.

Note "ProcedureID" and "Description" columns. This information for new custom labels is used to update the X Internet configuration file.
- Open Windows "File Explorer" by right-clicking on Windows "Start" button and selecting "Open Windows Explorer."
Navigate to C:inetpubwwwrootXInternet.
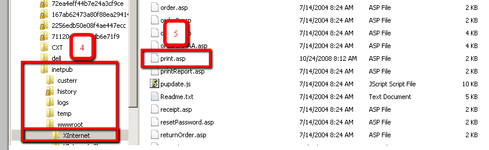
Notice "print.asp" file. This is the file to be edited.
- Copy "print.asp" file and paste as copy to create backup file.
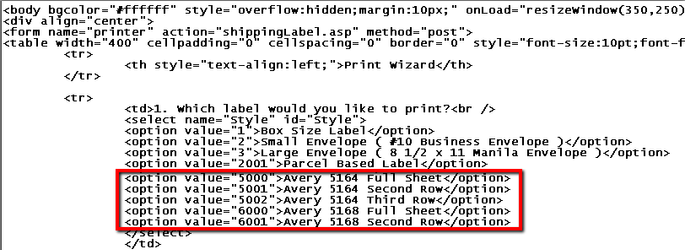
Open "print.asp" file with text editor. Note section with shipping label details.

Add new shipping label information into existing shipping label section by using "ProcedureID" and "Description" information noted in step # 2. Use same html format for new shipping labels as used with current labels. Eg: <option value="5000">Avery 5164 Full Sheet</option>
Save file.
- Immediately test new configuration by opening X Internet, entering a test order and using the "Print Shipping Label" link to determine of new labels appear. Select each new label added to confirm functionality. If shipping labels do not successfully function, review previous steps.
- If the previous X Internet functionality is required, copy backup "print.asp" file back to "print.asp."