| Anchor | ||||
|---|---|---|---|---|
|
| Table of Contents | ||
|---|---|---|
|
The Orders section displays a list of current orders with basic order information.
| Tip | |
|---|---|
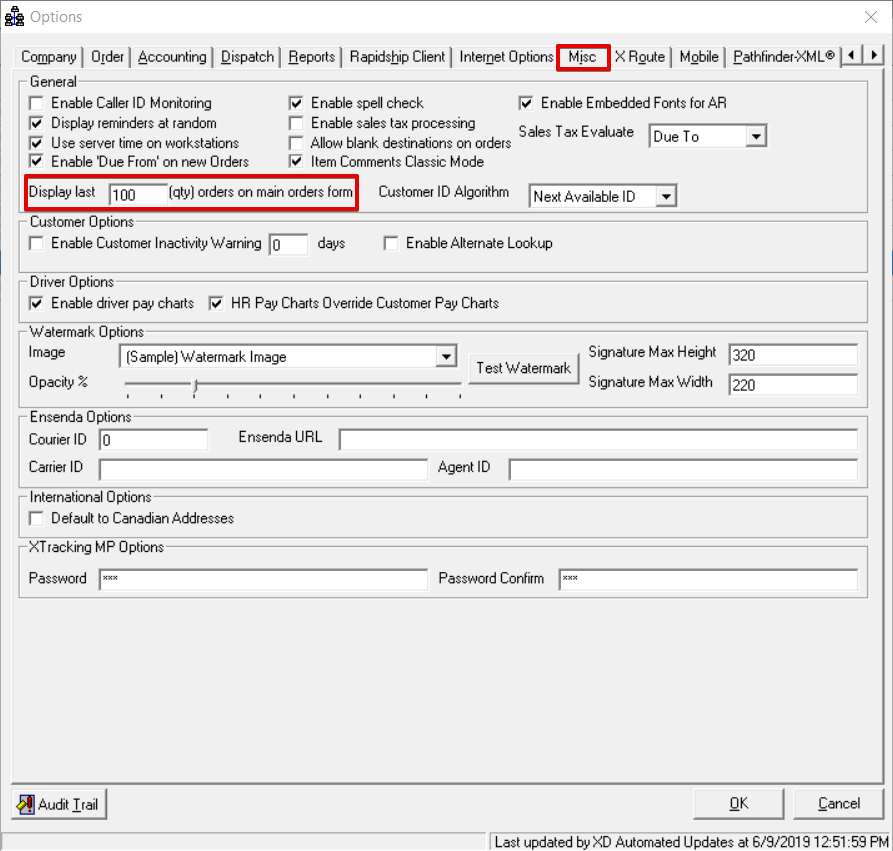
Quick Tip | : You can set the maximum number of orders to display in the Misc tab of the Global Options. See Global Options.
|
To access the Orders section go to On Demand > Orders. 
...
Field Name | Description |
|---|---|
 | The current status of the order is displayed by the color of the envelope. |
 Rated and uninvoiced |
 Invoiced and unpaid |
Invoiced and paid short |

Invoiced and paid |

Unrated and will not be invoiced |

Canceled | |
 | If the order has a dispatch flag set, a red flag icon |
Customer | The customer's name that the order is for. See Customers - New/Edit Customer. |
ID | The order ID. |
CSR | How the order was entered and/or who entered it. |
Origin | Name of where the order is being picked up from. |
Origin Address | Street address of where the order is being picked up from. |
Origin City | City of where the order is being picked up from. |
Destination | Name of where the order is being delivered to. |
Dest Address | Street address of where the order is being delivered to. |
Dest City | City of where the order is being delivered to. |
Customer ID | Customer ID for the Customer. See Customers - New/Edit Customer. |
Order Date | Date and time the order was placed. |
Order Type | Order type that is on the order. |
Attachments | The number of attachments on the order. |

How to Search for an Order
You can find orders by entering the criteria in the Look for field and selecting the column field you would like to Search Under.
...
Search by Order Number
If you know the order number you are searching for you can enter it in the search box in the top right.
| Tip | |
|---|---|
Quick Tip | : This search bar can be used throughout and not just in the Orders section. |
...
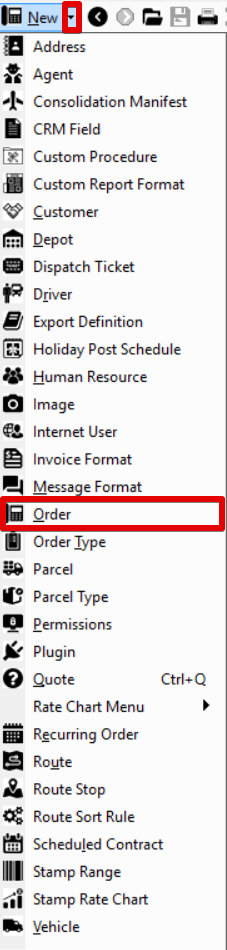
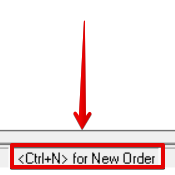
How to Add a New Order
| Excerpt | ||||||
|---|---|---|---|---|---|---|
Alternate Steps
|
How to Edit an Order
Go to On Demand > Orders.
Double click on the order you would like to edit.
How to Cancel an Order
Go to On Demand > Orders.
Double click on the order you would like to cancel.
Click the cancel
button
button in the top toolbar.
| Tip | |
|---|---|
Quick Tip | : To cancel a new order before it has been placed/saved, click the X in the top right to close the form. |
Toolbar
...
Field Name | Icon Name | Description | |
|---|---|---|---|
 | Save and Close | Save the current order and open a new order form. | |
 | Save and Keep Open | Save the current order and keep the order form open. | |
 | Reprint Dispatch Ticket | Print the order in a formatted print form or as seen on the screen depending on the selected Print dispatch ticket in the order type of the order. See Order Types (Classic Operations App). Disabled when creating a new order. | |
 | Print Shipping Label | Print a shipping label for the order that can be added to the package. Disabled when creating a new order.
|
|
| ||||||||
 | Use Imager to Scan Attachment | Scan a document using a scanner connected to your computer and add it as an attachment to the order. | ||||||
 | Insert File | Upload a file as an attachment to the order. | ||||||
 | Set Dispatch Flag | Flag either the Origin Remarks, Destination Remarks, Order Comments or all 3 of these fields for the order. The fields marked as flagged will be highlighted in red. | ||||||
| Cancel | Cancel the order. This will remove the order from the dispatch board and it will not be invoiced.
|
|
Disabled when creating a new order. | |||
 | Restore | Restore the canceled order. This will add the order back to the dispatch board and can be invoiced.
|
|
Visible only for canceled orders. | ||||
 | Return | Save and close the current order and create a new return order with the same Order Number but appended with a ".01" at the end. The new order will automatically fill in the same Customer ID, Contact, and Billing Group. The Origin and Destination information will be reversed. You will need to select an Order Type for the new order. | ||
 | Multiple Order Same Origin | Save and close the current order and create a new order with the same Customer ID, Contact, Billing Group, and Origin. | ||
 | Multiple Order Same Destination | Save and close the current order and create a new order with the same Customer ID, Contact, Billing Group, and Destination. | ||
 | Continuation | Save and close the current order and create new orders in a sequence with the same Order Number but appended with a ".01", ".02", ".03", etc. at the end. The new orders will automatically fill in the same Customer ID, Contact, and Billing Group. The Destination information will be entered for the Origin. You will need to select an Order Type for the new orders. | ||
 | Clone | Create a duplicate order with all of the information the same except for the dates which will be filled in as the current date. A pop-up will appear to select which optional fields you would like to add to the cloned order. | ||
 | Insert Customer Address | If the Origin Name or Destination Name field is selected, the current Customer Name and Customer Address information automatically filled in. | ||
 | Rate | Rate the order. | ||
 | Lock Charges | Lock or unlock the Charges tab. If the charges are locked, no changes can be made to the order under the Charges tab until the order has been unlocked.
| ||
 | Lock Driver Pay | Lock or unlock the driver pay on the order. If the driver pay is locked, no changes can be made to the driver assignment or pay under the Drivers tab until the order has been unlocked.
| ||
 | Bill Credit Card | Process a credit card in order to pay for the order. | ||
 | Recurrence | Turns the current order into a recurring order. See Recurring Order. | ||
 | Flip Addresses | Switch the Origin and Destination information. |
Re-calculate Distance | Recalculates the distance between origin and destination. | ||
 | View Tracking Status | Open the Order Status window to view the status of an order. See Order Status. | |
 | View Customer Notes | Opens the Customer Notes found on the Notes tab of the customer record.
|
|
| ||
 | View Driver Settlements | Displays the "Driver Settlement" amount for the order. |
 | Email Status | If clicked, the information from the Order Status will be emailed to email in the Email / Fax field when the order is saved and closed. |
 | Email Shipping Label | Open a form to email the shipping label. See How to Email a Shipping Label from the Order Form. |
Form
...
Field Name | Description | |||
|---|---|---|---|---|
Customer ID | The customer ID number for the customer associated with the order.
| |||
|
|
 to
to
| ||
Contact | The customer contact name.
|
|
 to
to
| |||
Billing Group / Cost | Used for grouping invoices. ExampleIf the customer has sub-accounts, the sub-account can either be entered directly or picked from a list. This field can be filled in when the customer has different departments or offices that require a single invoice but need to track the usage and billing by department/office. | ||
Origin | |||
Name | The address name of the origin for the order.
| ||
 | The address of the origin. The button is enabled once the address is chosen from the Name field above.
| ||
| |||
 | Click to view the route stop created and the route sort rule applied to the order. | ||
 | Click to view order, short and damaged parcel information. | ||
 | Click to view the origin location information. | ||
Phone | Phone number of origin address.
| ||
 | Click the Remarks... button to open a list of global origin remarks to select from that you can add or edit. | ||
Get Directions | Click the "Get Directions" link to open a window with a map and directions from the origin to the destination of the order. | ||
Click the arrow |
icon to open the Remarks in a separate window for easy editing. | |
Remarks (textbox) | Comments for the origin. Displayed in |
the Driver App on the Stop Info screen, the Client Portal Track Order details, and X Internet Track Order. If the stop is consolidated in |
the Driver App, only the Remarks of the first consolidated will be displayed.
|
|
|
| |||
Destination | |||
Name | The address name of the destination for the order.
| ||
| The address of the origin. The button is enabled once the address is chosen from the Name field above.
| ||
| ||
| Click to view order, short and damaged parcel information. | |
| Click to view the destination location information. | |
Phone | Phone number of origin address. | |
| Click the Remarks... button to open a list of global origin remarks to select from that you can add or edit. | |
Get Directions | Click the "Get Directions" link to open a window with a map and directions from the destination to the origin of the order. | |
Click the arrow |
icon to open the Remarks in a separate window for easy editing. | |
Remarks (textbox) | Comments for the destination. Displayed in |
the Driver App on the Stop Info screen, the Client Portal Track Order details, and X Internet Track Order. If the stop is consolidated in |
the Driver App, only the Remarks of the first consolidated will be displayed.
|
|
|
| ||
Email /SMS Text Alerts | Email address(es) and/or phone number(s) that will automatically receive status update notifications for the order. Separate multiple entries with a semicolon ";".
| |
|
| ||
Placed / At PU / Picked Up / At Del / Delivered / ETA | These checkboxes determine which emails will be sent during the delivery process. If a checkbox is grayed and you are unable to check it, this means that the status event is not set up with a message format in the customer record for the customer on the order.
|
|
|
General
...
Field Name | Description | |
|---|---|---|
References | References for the order usually supplied by the customer and will appear on the driver’s device and the customer’s invoice. You can use the dropdown to select from a list of approved references or manually type one in. | |
Pickup |
| |
Service Type | The service type for the order. See Service Types (Classic Operations App).
|
|
| |
Order Type | The order type for the order. Only order types that are priced for this customer will appear in the list.
|
Parcel Info | The parcel type that is being picked up. See Parcel Types (Classic Operations App). This list may be limited to the Available Parcel Types selected in the customer record Parcel Types tab if Enable parcel type list in XD is enabled on the customer record.
|

| ||
Delivery |
| |
Force Location Scan | Require the driver to scan a location barcode in the Driver App, when completing the order. Selection options include: "None", "Upon Arrival", "Upon Departure", or "Both". See Force Location Scan in the Driver App (Nextstop 3).
| |
Labels | Label(s) to be used for reporting purposes. See Labels (Classic Operations App). | |
Order Comments | General notes about the order.
|
|
Not displayed in |
the Driver App or the Client Portal. |
Charges
The Charges tab Charges tab shows a summary of all charges applied to an order.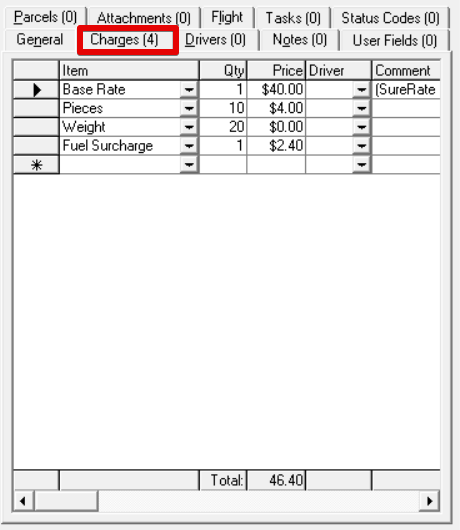
...
Field Name | Description | ||
|---|---|---|---|
Item | Items being charged on the order.
| ||
Quantity | The quantity for the Item listed.
| ||
Price | The price of the item. It is automatically be calculated and entered, but can be edited with proper "Order" permissions. | ||
Driver | A specific driver to be paid on the item for multiple driver orders. All the commission on the item will be given to the selected driver, overriding any percentage split that may be applied under the Driver tab. | ||
Comments | Comments or notes for the item. | ||
Rate Explanation | Click to display the Item Rate Details for the item which shows how the item rate was calculated.
|
|
|
How to Remove an Item
Select the row of the item by clicking on the row, a triangle will appear, then press the Delete key.
...
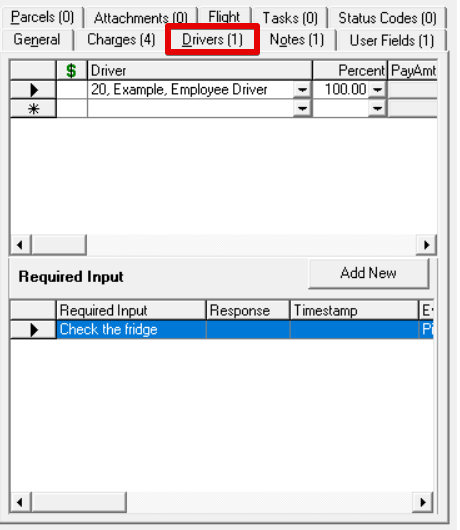
Drivers
The Drivers tab Drivers tab shows all the drivers assigned to an order and any required inputs.
| Note |
|---|
Adding drivers in this tab will not dispatch the order to the driver and the order will show in the dispatch with a driver already assigned. |
 x`
x`
Field Name | Description | |
|---|---|---|
$ | If this dollar symbol image is present, it indicates the driver has been "settled" for the job (meaning, a settlement was run for the driver and this order was included in the paid items). The symbol will show on both the tab, and the field inside the tab. | |
Driver | Selected driver(s) for the order.
|
|
| ||||
Percent |
The percentage value is used to calculate how much the driver will be paid. This value will default to 100% when a driver is selected.
|
|
| |||||||||
Pay Amount |
The amount the driver will be paid.
| ||||||||
Settlement Number | The settlement number associated with the driver for an order. See Display Settlements. | ||||||||
Required Input | |||||||||
Add New | Click the button to add a new specific driver prompt for the driver when he/she picks up and/or delivers the order. See Driver App Required Driver Input.
| ||||||||
Required Input | The prompt to display for the driver. | ||||||||
Response | The driver's response. | ||||||||
Timestamp | The timestamp when the driver responded. | ||||||||
Event | When the prompt will appear.
| ||||||||
How to Remove a Driver or Delete a Required Input
Select the row of the driver or required input by clicking on the row, a triangle will appear, then press the Delete key.
...
Notes
The Notes tab Notes tab can be used to add notes for the order. See Notes. 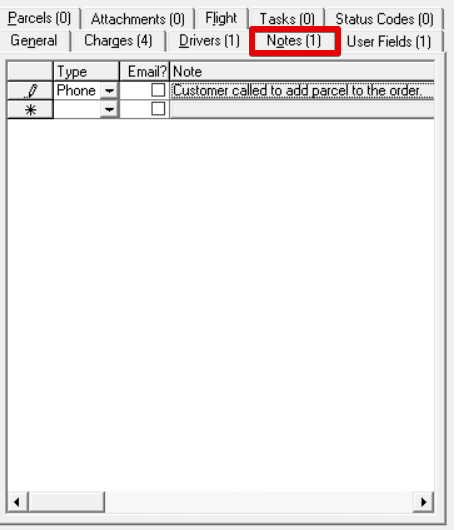
...
Field Name | Description |
|---|---|
Type | The type of note. Default note types include:
|
If checked, the note will be emailed to the email address in the Email field on the order form when using [OrderNotes] in a message format associated with the customer. See Message Formats (Classic Operations App) and Customers - New/Edit Customer. | |
Note | The note. Click here to add or edit the note. |
How to Remove a Note
Select the row of the note by clicking on the row, a triangle will appear, then press the Delete key.
...
User Fields
...
The User Fields tab Fields tab allows you to customize up to 12 userto 12 user-defined fields to be able to track specific data and use for custom reporting. See How to Set Up User Definable Fields for Orders.
Parcels
The Parcels tab Parcels tab is used for listing and tracking individual parcels on the order.
...
Field Name | Description |
|---|---|
Parcel ID | The automatically generated unique identifier of the parcel. |
Parcel Type | The type of parcel. To edit parcel types available see Parcel Types (Classic Operations App). |
Refrigeration Type | The refrigeration type selected:
See set up requirements for Parcel Refrigeration Types. |
Dims | Click to open the Dimensional Weight Calculator to enter the dimensions of the parcel and calculate the Dimensional Weight of the parcel. See Dimensional Weight Calculator. |
Audit | Click to view the audit trail for the parcel. |
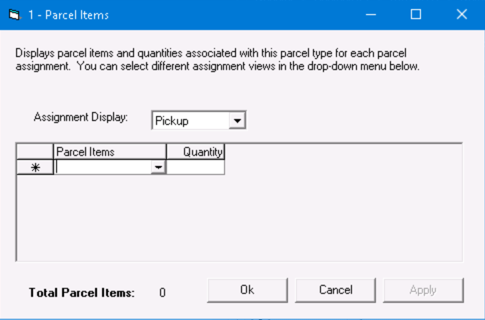
Parcel Items | Click to view the parcel items and quantities associated with the parcel types. |
 | |
Units in Container | The number of units in the container. |
Parcel Weight | The total weight of the parcel. |
Reference | Barcode for the parcel. |
Comment | Comments that relate to the parcel. |
CustomerParcelID | Used when the customer has their own unique parcel ID for the parcel. |
CustomerMasterParcelID | Used when the customer has their own master parcel ID for the parcel. |
CustomerReference1 | Customer reference information for the parcel. |
CustomerReference2 | |
ConsolidationBarcode | Master barcode associated with the parcel |
UpdatedWhen | When the parcel was last updated. |
UpdatedBy | Who updated the parcel last. |
CreatedWhen | When the parcel was created. |
CreatedBy | Who created the parcel. |
MiscData | Click to view X Stream Imported Parcel Data. |
Order BOL | The bill of lading for the order. This can be used for grouping/filtering in the Driver App. |
Master BOL | The master bill of lading for the order. This can be used for grouping/filtering in the Driver App. |
Pickup OS&D | Click on the red info button |
to view the over, short and damaged parcels. |
Delivery OS&D |
Received OS&D |
How to Remove a Parcel
Select the row of the parcel by clicking on the row, a triangle will appear, then press the Delete key.
...
Attachments
...
The Attachments tab displays all files attached to the order. To add a new attachment click the insert file icon ![]() in the toolbar o right click and select Insert File or Create Text File. Double click to open the attachment or select the attachment then right-click and select Open... The right-click menu also allows you to delete, save the attachment to your computer, and edit the Description.
in the toolbar o right click and select Insert File or Create Text File. Double click to open the attachment or select the attachment then right-click and select Open... The right-click menu also allows you to delete, save the attachment to your computer, and edit the Description.
Flight
The Flight tab Flight tab allows you to enter flight information associated with the order.
...
Field Name | Description |
|---|---|
Departure Airport | The airport code of the airport the flight is departing from. |
Departure Carrier | The name of the airline of the departure flight. |
Departure Flight | The flight number of the departing flight. |
Departure Time | The time of the departing flight. |
Departure Type | The type/model of the departing flight airplane. |
Departure Distance from Origin | The distance from the "Origin Address" of the order to the airport. |
Arrival Airport | The airport code of the airport the flight is arriving at. |
Arrival Carrier | The name of the airline of the arrival flight. |
Arrival Flight | The flight number of the arrival flight. |
Arrival Time | The time of the arrival flight. |
Arrival Type | The type/model of the arrival flight airplane. |
Arrival Distance to Destination | The distance from the airport to the "Destination Address" of the order. |
Airbill Number | The Airbill Number for the charges of the flight. |
Carrier Charges | The total charges for the flight. |
Comments | Comments related to flight information. Clicking on the arrow icon |
will open the comments in a separate window for easy editing. |
Tasks
...
Tasks are listed in the Tasks tab. The DueDate of overdue tasks will be highlighted red and completed tasks will be highlighted in green. You can add, edit and delete tasks by right-clicking in the Tasks section.
| Tip | ||
|---|---|---|
| title | Quick Tip | : When selecting to Edit or Delete a task, make sure to select the task first and it is highlighted in blue. |
...
| Note |
|---|
The task must be completed to dismiss the pop up. |
...
When the Mark as Completed button is clicked, a date field will appear to enter the time and date that the task was completed.
| Tip | ||
|---|---|---|
| title | Quick Tip | : The Open Parent button will open the human resource record attached to the task. |
Status Codes
The Status Codes tab allows you to enter or view status information regarding an order.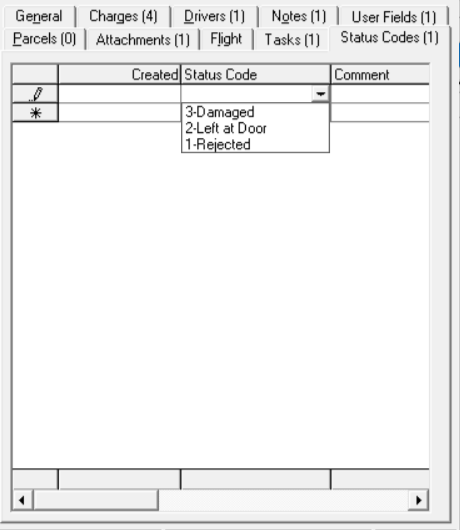
...
Field Name | Description |
|---|---|
Created | Date and time the status code was added to the order. Localized time based on the origin address. |
Status Code | The status entered for an order. This list is populated from the Status Codes section. See Status Codes (Classic Operations App). |
Comment | Comment related to the status code for the order. |
Removing a Status Code
Select the row of the status code by clicking on the row, a triangle will appear, then press the Delete key.
...
Order Status Bar
The order status bar is order status bar is at the bottom of the order screen and contains useful information.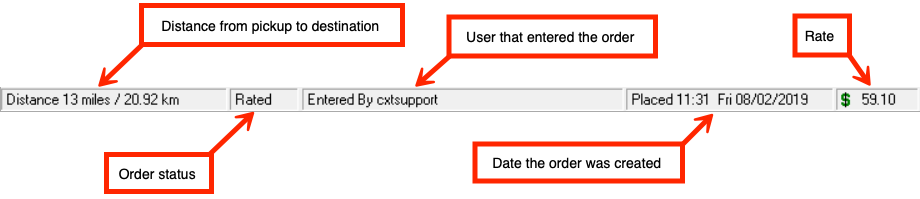
...
| Anchor | ||||
|---|---|---|---|---|
|
Double-click the click the Distance on the order status bar to bar to open the Override Calculated Distance windowDistance window. Fill in the desired distance and click OK to override to override the Original Calculated Distance.
...
Example
The calculated distance is 0.4 miles but you want to charge a minimum of 5 miles.
| Page Properties | ||
|---|---|---|
| ||
|