The route stop form allows you to edit information for a posted route stop or to add a new stop to a posted route.
How to Add a New Route Stop
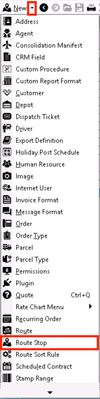
From X Dispatch
- Click the down arrow next to the New button in the toolbar.
- Click Route Stop.
From X Route Dispatch Board
Click the New button  in the toolbar.
From Route Manifest
Click the New Stop button ![]() at the top.
at the top.
From Editing a Stop
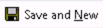
In the toolbar, click Save and New to create a new stop on the current route, or click Save and Clone to create a new stop on the current route with the same information, except the Location, of the current stop.
How to Clone a Posted Route Stop
You can clone a routed post stop.
- Open a posted route stop.
- Click Save and Clone.
How to Edit a Posted Route Stop
From X Dispatch
Use the search field in the top right under the toolbar.
From the Route Manifest
Double-click on any column of the stop you would like to edit, except for the "Name Address Signature" column.
Clicking on the "Name Address Signature" column will open a web browser with a map showing the address.
How to Delete/Deactivate a Posted Route Stop
Once a route stop has action taken on it, it cannot be deleted. It can only be deactivated.
Stop Form
Top toolbar
The top toolbar contains icons representing actions that can be taken in regards to the route stop.

| Icon | Field Name | Description |
|---|---|---|
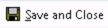
| Save and Close | Save changes to the route stop and close the form. |
| Save and New | Save changes to the current route stop and create a new route stop to the current route. |
| Save and Keep Open | Save changes to the current route stop and keep the form open. |
| Save and Clone | Save changes to the current route stop and create a new route stop with the information, except for the Location, of the current stop. |
| Close For X Dispatch 18.1 or older, it is "Cancel". | Close the form without saving any changes. |
| Delete | Delete the current route stop. |
| Parcels | Display the parcels form for contract stop parcels. Custom work is required for this functionality to be enabled. The parcels icon is only displayed if enabled by CXT Software through custom work. |
| Distribution Parcels | Display the Parcel Manifest. See Parcel Manifest. |
| View XS Data | Display XS Data. X Stream (XS) Data is used during integration imports if needed for the integration. |
| Insert File | Insert a file attachment from your computer to the route stop. |
| View Scan History | For X Dispatch 20.0 or newer. For older versions See Basic Information below. Generates and displays a scan history report for this stop it in the default web browser. |


Basic Information
This section of the form contains basic information about the route stop.

| Field Name | Description |
|---|---|
| Scan Barcode | The PKID of the posted route stop, an associated stamp, or an on demand order ID. Quick Tip When creating a new route stop use one of the following methods to populate this field:
|
| View Audit Trail... | Opens the audit trail allowing you to view all the changes made to the stop form. For X Dispatch 19.2 or older. For newer versions see Top Toolbar above. |
| View Scan History... | Generates and displays a scan history report for this stop it in the default web browser. For X Dispatch 19.2 or older. For newer versions see Notes/remarks/action button below. |
| Driver ID | The ID of the driver assigned to the route. This field is read-only. Quick Tip Click the on the field name, "Driver ID", to open the "Edit Driver" form for the assigned driver. See Drivers - New / Edit Driver. |
| Date | Date the stop was posted on or assigned if creating a new stop. In X Dispatch 19.0 or newer, this field is editable for both route stops and contract stops. For older versions, this field is editable only for route stops and not for contract stops. If contracts for the original post date or the changed date are unposted, the posted contract stop will unpost. |
| Contract ID / Stop ID | Contract ID and Contract Stop ID of the Contract Stop from which the route stop was posted. This field is read-only. Both will read "None" if the stop was manually added/created from an on demand order, or imported. Quick Tip Click the on the field name, "Contract ID" or "Stop ID", to view/edit the "Edit Contract" or "Edit Contract Stop" form. See Contracts / Contract Stops - New / Edit Contract Stops. |
| Route ID | The ID of the route that the stop is currently assigned. Use the drop-down box to select a different route. Quick Tip Click the on the field name, "Route ID", to view/edit the "Edit Route" form for the selected route. See Planning - New/Edit Route. |
| Active | Mark the stop as active or inactive. Inactive stops will post as inactive. |
| Parent Stop | Mark the stop as a parent stop for other stops. If this checkbox is checked, this stop will show up in the "Parent Stop" drop-down for other stops on this route. This parent/child relationship can be used for activating or deactivating posted routes on the dispatch board. If the parent is marked as inactive, any children will also be marked inactive - and visa versa, if the parent is marked as active, all of the associated children stops will be activated. |
| Arrived | Time and date the driver arrived at the stop. Quick Tip Click on the field name, "Arrived", to insert the current date and time into this field. |
| Completed | Time and date the stop was completed. Quick Tip Click on the field name, "Completed", to insert the current date and time into this field and set the "Completed By" field to "CSR Manual Completion". |
| POD | POD information for the stop, if available. If a signature was captured, the |
| POD Comments | Requires X Dispatch 20.0 or newer. POD comments for the stop. |
| Completed By | The person who completed the stop, or "CSR Manual Completion" if the stop was completed by clicking If you run custom reports based upon any "Route Stop Completion Type", these reports need to be updated to include a new completion type: "X Internet Driver Completion" (introduced in X Dispatch 16.2.0). Please contact Customer Service to request assistance. |
Parent Stop (Pull-Down) | Select a stop from the list of stops on the route marked as "Parent Stops" to mark this stop as a child of the selected stop. |
Force Location Scan | Requires X Dispatch 18.0.
|

Tabbed Section
This is the tabbed section of the form.
Location Tab
This tab contains data about the location of a route stop is to take place.
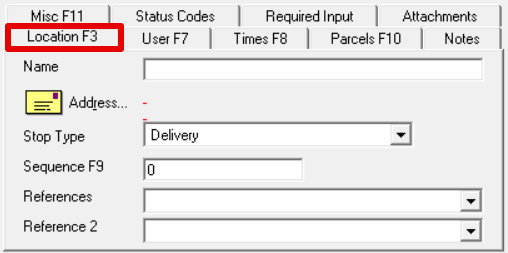
| Field Name | Description |
|---|---|
| Name | Name of the location for the route stop. |
| Address | Address where the stop will occur. Click |
| Stop Type | Type of stop. See Stop Types. |
| Sequence | A number used to place this stop in the route in relation to other stops. This number must be unique for each stop on a given route. |
| Reference 1 | Customer references. |
| Reference 2 |

User Tab
This tab contains any data placed in user fields in relation to a route stop.
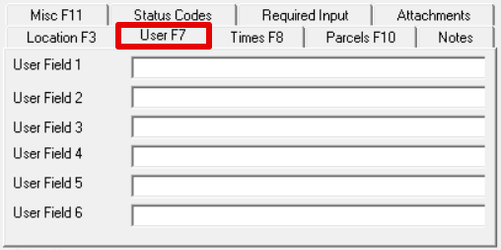
| Field Names | Description |
|---|---|
| User Field 1 | Available fields for additional data to capture on route stops. These field names can be customized on the customer record in the "General" tab under "Route Stop User Field Captions". See Customers - New/Edit Customer. |
| User Field 2 | |
| User Field 3 | |
| User Field 4 | |
| User Field 5 | |
| User Field 6 |
Times Tab
This tab contains the min, max, and preferred time for a stop.
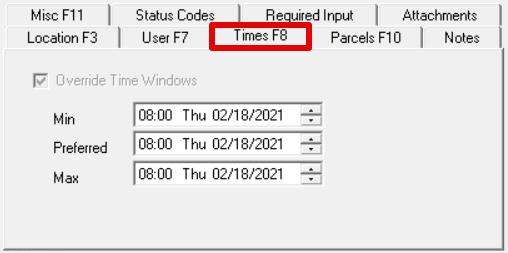
| Field Name | Description |
|---|---|
| Override Time Windows | Overrides the global Options > X Route "Stop Time Settings". See Global Options. |
| Min | The earliest time the stop should be completed. |
| Preferred | Preferred time for the stop to be completed. |
| Max | Latest time the stop should be completed. |
Parcels Tab
This tab contains data about parcels for the route stop.
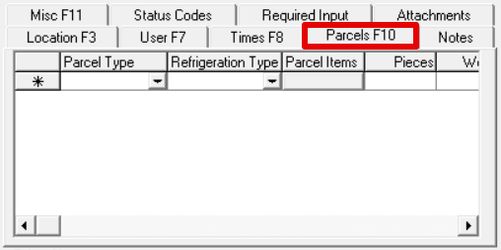
| Field Names | Description |
|---|---|
| Parcel Type | Type of parcel. |
| Refrigeration Type | Requires X Dispatch 19.2 or newer. The refrigeration type selected:
See set up requirements for Parcel Refrigeration Types. |
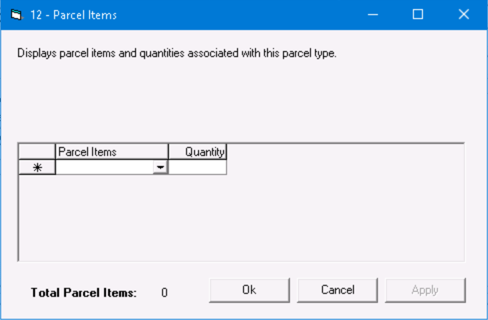
| Parcel Items | Requires X Dispatch 19.2 or newer. Click to view the parcel items and quantities associated with the parcel type.
|
| Pieces | The number of pieces. |
| Weight | The weight of the parcel. |
| Reference | Parcel barcode string (the scannable entity), that comes from the barcode image scan to show parcel chain of custody and OS&D. |
| Description | Description of the parcel |
| Audit | Click in this column to see the audit trail |
| Reference2 | The parcel barcode. |
| MasterBarcode | MasterBarcode associated with the parcel on route stop. See Master Barcodes. |
| ConsolidationBarcode | The ConsolidationBarcode is used for on demand orders but has the same functionality as a master barcode. |
| UpdatedWhen | Last date and time the parcel information was updated. |
| UpdatedBy | The last user to update the parcel information. |
| CreatedWhen | Date and time the parcel information was created. |
| CreatedBy | The user that added the parcel information. |
| StatusCode | Status codes, or "exception codes", are used to indicate unsuccessful delivery of a parcel. |
| MiscData | Miscellaneous data associated with the parcel. |
Notes Tab
Requires X Dispatch 21.0 or newer.
This tab can be used to add notes for the route stop. See Notes.
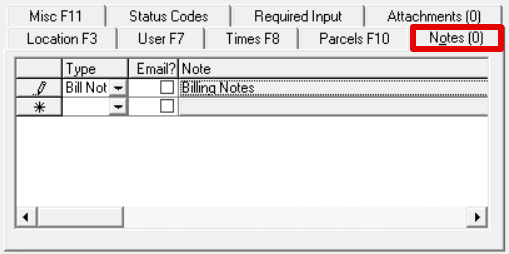
Field Name | Description |
|---|---|
| Note | The note. Click here to add or edit the note. |
| Type | The type of note. Default note types include:
See Note Types. |
Misc Tab
This tab contains miscellaneous information about the route stop.

| Field Name | Description |
|---|---|
| Secondary Lookup | A second reference that can be used for sorting or grouping route stops. |
| Customer Route ID | This field can be used with Customer Stop ID and Customer Account ID to track data regarding a customer's internal reference data relating to a given route and its stops. ExampleUsed in an imported record needs to make note of the shipping partner's names. |
| BOL | BOL, or Bill Of Lading, is used for grouping. Nextstop consolidation replaces the use of BOL. Example for X MobileYou have a route that runs in downtown Phoenix and services 4 different customers, but you don't want to have 4 different routes, and prefer to have 1 route with co-mingled route stops for all 4 customers. However, your driver needs to have a parcel chain of custody for the imported work to give the shipper visibility to when the freight is loaded onto the truck and when it is delivered - this means 4 separate Load Stops for each customer. A BOL on the ContractStop level can be used to set a grouping value that will allow the driver to take bulk action on all 4 route stops at once without having to open each route stop, find the right parcels to scan while loading the truck, and add separate POD/signature info for each stop. |
| Customer Stop ID | The Stop ID, if any used by the customer to reference this route stop. |
| AFL1 | Advanced fallback rating lookup. |
| Customer Account ID | The Account ID, if any used by the customer to reference this stop/route/location. |
| AFL2 | Advanced fallback rating lookup. |
| Override Settlement | Overrides the driver pay. When checked and a value is entered in the textbox, the driver will be paid that amount in the textbox for this stop. |
| Send Parcel Scans Immediately | Parcel scan timestamps will be sent to the server immediately, and do not wait until the stop has been marked as "Completed". |
| Rate Chart Lookup | The text used to find which override rate chart to use for calculating the route stop rate if an override rate chart is used upon import from an integration. |
Status Codes Tab
This tab contains status codes for the route stop. See Status Codes for more information.

| Field Name | Description |
|---|---|
| Status Code | Status code for the route stop. Status codes can come from a driver via the mobile device, or a CSR adding a status code in X Dispatch. |
| Comment | Comment for the status code. |
| Created | Date and time the status code was created. Localized time based on the route stop address in the Location tab. |
Required Input Tab
This tab contains required driver input for the stop. Click the Add New button to add a new required driver input for the stop. See Nextstop 3 Required Driver Input. Double click on a required driver input to add a driver response or edit / delete the required driver input.
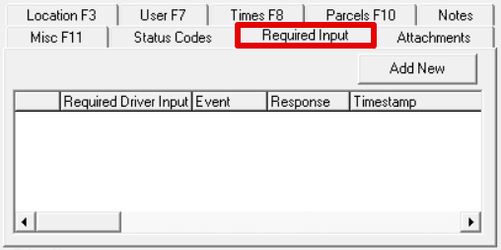
| Field Name | Description |
|---|---|
| Required Driver Input | The prompt the driver will see at the stop. |
| Event | When the required driver input occurs. "Arrived" or "Completed". |
| Response | The driver's response. |
| Timestamp | Date and time the driver entered the information. |
Attachments Tab
This tab contains attachments for the route stop. Right-click to insert a file, edit a description, or delete a file.
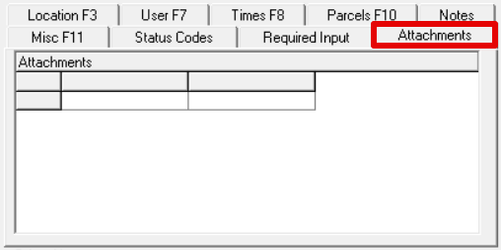
| Field Name | Description |
|---|---|
| ID | Attachment ID |
| FileName | The filename of the attachment. |
| Description | Description of the attachment. |
| CreatedBy | The user that inserted the attachment. |
| CreatedWhen | Date and tune the attachment was uploaded. |
| UpdatedBy | Last user that updated the attachment details. |
| UpdatedWhen | Last date and time the attachment was updated. |
Rates
This section of the form contains information about rates for the route stop.

| Field Name | Description |
|---|---|
| Base Rate | The base rate for the stop. Quantity is set to 1 and is not editable. The price is automatically populated and can only be edited if the user has permissions to do so. See Permissions. |
| Pieces | The number of individual pieces being picked up or delivered for the stop. The price is automatically populated and can only be edited if the user has permissions to do so. See Permissions. |
| Weight | The total weight of all pieces to be picked up or delivered. The price is automatically populated and can only be edited if the user has permissions to do so. See Permissions. |
(2 selected accessorial items) | Select the accessorial item(s) in the drop-down box(es). Available assessorial items are from the stamp rate chart used to calculate the rate of the route stop. See Base Rate Charts - New / Edit Stamp Rate Charts. |
| Surcharge Amount | Enter a price if a surcharge is required for the route stop. Quantity is set to 1 and is not editable. |
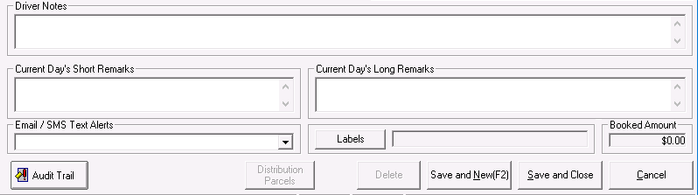
Notes/remarks/action buttons
| Field Name | Description |
|---|---|
Driver Notes "Notes" in X Dispatch 20.0 or older. | General notes about the route stop. Displayed in Nextstop on the Stop Info screen and in X Internet it is displayed under Short Remarks column with the Current Day's Short Remarks in Route Tracking. If the stop is consolidated in Nextstop, only the Remarks of the first consolidated will be displayed. Quick Tip Entering a URL in this field will display as a clickable link in Nextstop 3.1.1 or newer. |
| Current Day's Short Remarks | Short remarks if the order is a scheduled stop. Displayed in Nextstop on the Stop Info screen and in X Internet under Short Remarks column in Route Tracking. If the stop is consolidated in Nextstop, only the Remarks of the first consolidated will be displayed. Quick Tip Entering a URL in this field will display as a clickable link in Nextstop 3.1.1 or newer. |
| Current Day's Long Remarks | Long remarks if the order is a scheduled stop. Displayed in Nextstop on the Stop Info screen. If the stop is consolidated in Nextstop, only the Remarks of the first consolidated will be displayed. Quick Tip Entering a URL in this field will display as a clickable link in Nextstop 3.1.1 or newer. |
Email/SMS Text Alerts "Email/Fax Alerts" in X Dispatch 20.0 or older. | The email address and/or phone numbers to automatically receive status update notifications for your this route stop. You can enter multiple email addresses and/or phone numbers by separating them with a semicolon ";". |
| Labels | Requires X Dispatch 20.0 or newer. Label(s) to be used for reporting purposes. See Labels. |
| Booked Amount | Total from rates section. |
| Audit Trail | Requires X Dispatch 20.0 or newer. For older versions See Basic Information above. Opens the audit trail allowing you to view all the changes made to the stop form. |
| Parcels | Display the Parcels form for contract stop parcels. The Parcels button is only displayed if enabled by CXT Software through custom work. |
| Distribution Parcels | Display the Parcel Manifest. See Parcel Manifest. |
| Delete | Deletes the route stop and closes the window. |
| Save and New | Saves changes made to the route stop and opens a new form to create a new route stop. |
| Save and Close | Saves changes made to the route stop and closes the window. |
| Cancel | Discards any changes made and closes the window. |