Images (X Dispatch 21.0)
For X Dispatch 21.0. See here for other versions.
Images are used in several places throughout X Dispatch, and the web services. For example company logos, shipping labels, invoice formats, etc.
How to Add an Image
Images added must be in one of the following formats: JPG, BMP, GIF, or PNG (PNG requires X Dispatch 21.0.4 or newer).
- Go to Maintenance > Images.
- Click the button.
Alternate Steps
- Click the arrow next to the New button, or press Alt + N keys.
- Select Image.
How to Edit an Image
- Go to Maintenance > Images.
Click the image you would like to edit or right-click the row and select Edit.
The right-click menu option Open in New Window will open the edit form in a window that can be moved around.
How to Delete an Image
- Go to Maintenance > Images.
Click the image you would like to delete.
Click the button.
- Click Ok to confirm you would like to delete the image.
Alternate steps
- Go to Maintenance > Images.
Right-click the image you would like to delete and select Delete.
If the image you are trying to delete is currently in use, an error message will be displayed.
How to Download an Image
- Go to Maintenance > Images.
Click the image you would like to delete.
Click the button.
Section Functions
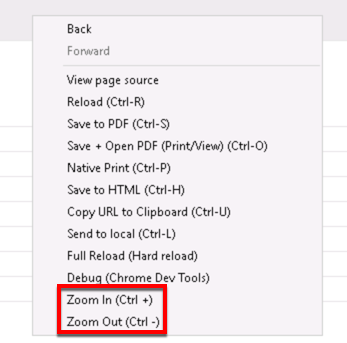
You can customize which columns you would like to view and arrange the order by clicking the Edit Grid Layout icon . Requires X Dispatch 19.1 or newer. You can switch between a table view and a card view by clicking on the Card View icon or Table View icon . Requires X Dispatch 21.0 or newer. You can zoom in or out of Next Dispatch pages in X Dispatch by right clicking on the page (other than on a card or table) and selecting Zoom In or Zoom Out, or use the Ctrl + or Ctrl - keys. Use the checkbox at the beginning of each row, or at the top of each card, to select multiple records. Quick Tip No more than 2 windows can be open or edited at a time. Right click on a row or card to view right click menu options.Customize Grid Layout
Change View
Zooming Settings
Select
Right Click Menu


