/
How to Set Overage Defaults in Nextstop 2
How to Set Overage Defaults in Nextstop 2
- Michelle Cabaya (Unlicensed)
- Chaz Baxter (Unlicensed)
Owned by Michelle Cabaya (Unlicensed)
When scanning overage parcels in Nextstop 2, you must provide basic details about the parcel by setting Overage Defaults. Once the Overage Defaults are set, they only need resetting again if the details for the next scanned parcel are different and are always reset after logging out.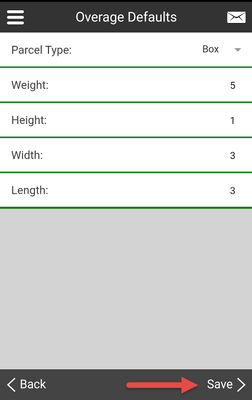
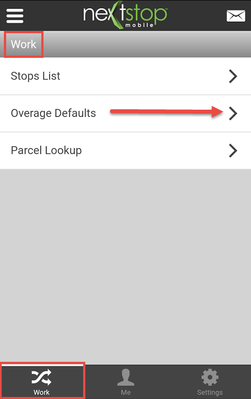
Step-by-step guide from the Home screen/Settings screen
Select Overage Defaults.

- Select a Parcel Type from the drop-down list of available parcel types. The Parcel Type is a required field, once selected the Save button becomes enabled for selection and the remaining fields are optional.
- Enter the weight of the parcel in the Weight field.
- Enter the height of the parcel in the Height field.
- Enter the width of the parcel in the Width field.
- Enter the length of the parcel in the Length field.
- Select the Save button in the bottom-right corner.
- You are returned to the Home screen.
Step-by-step guide from the pull-out menu
The pull-out Menu icon is the easiest way to navigate to Overage Defaults from any screen in Nextstop 2.
Select the pull-out Menu icon located in the top-left corner of the app.
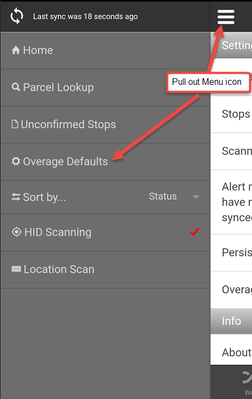
- Select Overage Defaults.
- Follow steps 2-7 from above.
Step-by-step guide when scanning a parcel
- Once an unexpected parcel is scanned a voice notification saying "Input Needed" is played and the Overage Defaults screen is displayed.
- Follow steps 2-7 from above.
Quick Tip
When scanning multiple parcels, you will not be asked for parcel type again. If you need to change the parcel type you can change your overage default or edit the parcel.
Related articles
, multiple selections available,
Related content
Overage Defaults
Overage Defaults
More like this
How to Set Overage Defaults in Nextstop 2
How to Set Overage Defaults in Nextstop 2
More like this
How to Require Parcel Types and/or Parcel Status Codes When an Overage is Scanned
How to Require Parcel Types and/or Parcel Status Codes When an Overage is Scanned
More like this
How to Require Parcel Types and/or Parcel Status Codes When an Overage is Scanned
How to Require Parcel Types and/or Parcel Status Codes When an Overage is Scanned
More like this
Overage Defaults in the Driver App
Overage Defaults in the Driver App
More like this
Parcel Edit
Parcel Edit
More like this