Nextstop 2 Workflows
- Michelle Cabaya (Unlicensed)
- Chaz Baxter (Unlicensed)
In Nextstop 2, pickup and delivery workflow starts with the Stops List. The Stops List displays each location that has active and complete pickups and/or deliveries. There are a variety of set up options to accommodate a mobile user's needs and preferences.
The navigation buttons at the bottom of Nextstop 2 guide you through a standard workflow. The navigation button pointing to the right indicates the next suggested action. This article demonstrates a typical workflow for completing On-Demand and Route stops.
Any change to settings using the pull-out menu is temporary and resets to the default at log out. The pull-out menu settings are meant to temporarily toggle on or off to make navigation quick and easy for the mobile user. Logging out of the device resets those temporary settings to the default settings. Changes made from the Settings menu located at the bottom right of the screen (with the exception of Persist Stops List Filter, which is always a temporary setting) are saved to X Dispatch and persist even after a logout.
Confirming/Rejecting Stops
After an On-Demand Stop is assigned to a mobile user, the first step in the workflow is to confirm or reject the stop. When a mobile user confirms the stop, they acknowledge that they reviewed the order details and commit to completing it on time. When a mobile user rejects the stop, they are notifying dispatch that they are not accepting the work so the dispatcher can send the order to a different driver. New stops are confirmed or rejected in two places, on the Stops List screen, or by selecting Unconfirmed Stops located in the pull-out menu located in the top left corner of the screen.
Unconfirmed Stops
The mobile user is notified of new, Unconfirmed On-Demand Stops through a sound notification played upon receiving assignment of the stop, which is repeated every five minutes until all stops are confirmed. The pull-out menu icon displays a red circle containing the number of Unconfirmed Stops. The number of Unconfirmed Stops is then prominently displayed on the corresponding pull-out menu screen.

Confirming or Rejecting at the Stop Level
Only one On-Demand stop is confirmed or rejected at a time at the Stop level. To confirm or reject all unconfirmed On-Demand stops see: Confirming or Rejecting through the Pull-Out Menu Selection.
To confirm a stop at the Stop level follow the steps below:
On the Stops List screen, select the Unconfirmed Stop. Unconfirmed stops are displayed with an orange color.
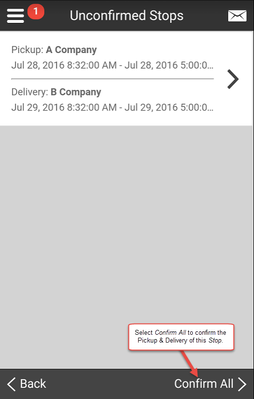
Select Confirm Stop at the bottom right of the Stop Info screen. On the Unconfirmed Stops screen, the Pickup and Delivery of the selected Stop is displayed.

Select Confirm All at the bottom right of the screen to confirm the Stop. This takes you to the Stop Info screen of that stop and the workflow can continue on, or use the Stops button located at the bottom left of the screen to return to the Stops List.
Repeat the above to confirm additional Unconfirmed Stops or to confirm multiple stops at once see: Confirming or Rejecting through the Pull-Out Menu Selection.
While in the process of confirming a Stop, tap the Stops button to return to the previous screen without confirming the order.
To reject a stop at the Stop level follow the steps below:
- On the Stops List screen, select the Unconfirmed Stop. Unconfirmed stops are displayed with an orange color.
From the Stop Info screen select the pull-out menu at the top left of the screen.

Select Reject Stop to reject that specific stop.

A Confirm warning is displayed, click Yes. This returns you to the Stop List.
- Repeat the above to reject additional Unconfirmed Stops, or to reject multiple stops at once see: Confirming or Rejecting through the Menu Selection.
Confirming or Rejecting through the Pull-Out Menu Selection
To confirm or reject all On-Demand stop(s), the quickest way is to use the pull-out menu.
To confirm all stop(s) through the pull-out menu, follow the steps below:
- Select the pull-out menu icon from any screen in the app or swipe from the left edge of the screen to the right.
- Select Unconfirmed Stops. All unconfirmed stops are displayed in the Unconfirmed Stops screen. The mobile user should review all the Stop Info details to verify they can complete it on time.
- Select Confirm All at the bottom right of the screen to confirm all displayed Unconfirmed Stops and return to the screen you were previously on.
To reject all stop(s) through the pull-out menu, follow the steps below:
- Select the pull-out menu icon from any screen in the app or swipe from the left edge of the screen to the right.
- Select Unconfirmed Stops. All unconfirmed stops are displayed in the Unconfirmed Stops screen.
- From the Unconfirmed Stops screen select the pull-out menu or swipe from the left edge of the screen to the right.
- Select Reject All to reject all the Unconfirmed Stops listed.
- A Confirm warning is displayed, click Yes. This returns you to the Stop List.
Selecting Stops
The first step in the pickup/delivery workflow is to select an On-Demand or Route Stop. The Stops List has a variety of options for customizing the display and sorting the Stops List, see Stops Workflow in Nextstop 2 for more information.
On-Demand stop tracking ID's start with the letter D, and Route stop tracking ID's start with the letter R.
- From the Home/Work screen, select Stops List.
- From the Stops List screen, select an On-Demand or Route Stop.
- The Stop details are displayed on the Stop screen.


Quick Tip
Taking action on any stop will mark it arrived and or confirmed if it is not already in that state. Actions include adding any of the following:
- Status Codes
- Photos
- Pieces
- Weight
- Parcels