Stops Workflow in Nextstop 2
- Michelle Cabaya (Unlicensed)
The images shown in this article were captured on an Android device, iOS device screens may differ, specifically on the selection lists.
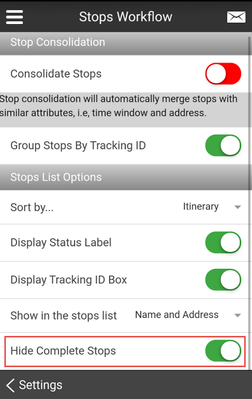
Stop Consolidation
Consolidate Stops
See Consolidate Stops in Nextstop 2 for more information.
Group Stops By Tracking ID
When Consolidate Stop is disabled and the Group Stops By Tracking ID is enabled, stops are grouped together by their Tracking ID in the Stops List and the Pickup stop is always listed above the Delivery stop.
Stops List Options
Sort by...
Using the Sort by setting sorts stops on the Stops List according to the following:
- Itinerary: While Itinerary sort is selected, On demand orders display first, then routed. On demand orders are sequenced by start time, then by dispatcher sequence. For Routed stops, dispatch may provide an Itinerary based on customer requests, time optimization, etc. Routed orders are displayed grouped by Route, then by start time.
- Closest to Me: While Closest to Me sort is selected, stops are sequenced from closest to the device's current GPS location to farthest, using a straight line distance.
- Status: While Status sort is selected, stops are sequenced by the status of the stop. Stops are sequenced by status in the following order.
- Unconfirmed: unconfirmed stops are secondarily sorted by end time from the earliest to the latest in descending order, then alphabetically by stop name.
- Arrived: arrived stops are secondarily sorted by actual arrival time from most recent arrival to the oldest in descending order.
- Late: late stops are secondarily sorted by end time beginning with the earliest in ascending order, then by closest to the device location, then alphabetically by stop name.
- Almost Late: almost late stops are secondarily sorted by the end time in ascending order, then by closest to the device location.
- Ready: ready stops are secondarily sorted by end time beginning with the earliest in ascending order, then by closest to the device location, then alphabetically by stop name.
- Almost Ready: almost ready stops are secondarily sorted by beginning time beginning with the earliest in descending order, then by closest to the device location, then alphabetically by stop name.
- Early: early stops are secondarily sorted by beginning time beginning with the earliest in ascending order, then by closest to the device location, then alphabetically by stop name.
- Not Ready: not ready stops are secondarily sorted by end time beginning with the earliest in ascending order, then alphabetically by stop name.
- Complete: completed stops are secondarily sorted by actual completion time beginning with the most recent.
Quick Tip
Each stop is color-coded to indicate the status of the stop.
Start Time: While Start Time sort is selected, stops are sequenced in chronological order based on the start of the stop time window.
- End Time: While End Time sort is selected, stops are sequenced in chronological order based on the end of the stop time window.
See Sort by... in Nextstop 2 for more information.
Display Status Label
When Display Status Label is enabled, the status of the stop is displayed in the stop's heading (e.g., Early, Ready, and Late).
The images below show the Display Status Label toggled on (green) and the Stops List with a status label on each stop.


The images below show the Display Status Label toggled off (red) and the Stops List without a status label on each stop.


Display Tracking ID Box
The Display Tracking ID feature allows the user to display or remove the Tracking ID Box on each stop.
- From the Stops Workflow screen, on Display Tracking ID Box line, toggle the button to the desired setting: off (red) or on (green).
The images below shows the Display Tracking ID Box toggled on (green) and the Stops List with Tracking ID box on each stop.
![]()
![]()
The images below shows the Display Tracking ID Box toggled off (red) and the Stops List without the Tracking ID box on each stop.
![]()
![]()
Show in the Stops list
The Show in the Stops list option allows the user to select what is displayed on each stop listed on the Stops List screen: Name, Name, and Address, or Street Address.
See Show in the Stops list in Nextstop 2 for more information.
Hide Complete Stops
When Hide Complete Stops is enabled on (green), stops that are marked Complete are not displayed in the Stops List.

If Group Stops By Tracking ID is enabled while Hide Complete Stops is also enabled, after a Pickup stop is completed it is still displayed until the Delivery is also completed. See the image below for an example.
