/
How to Set Up Scanning in Nextstop 2

How to Set Up Scanning in Nextstop 2

Nextstop 2 works in conjunction with Bluetooth barcode scanners utilizing the Human Interface Device, HID, technology. 

  • Best practices for using HID scanning is to pair your Bluetooth scanner BEFORE enabling HID scanning in Nextstop 2. Enabling HID scanning without a Bluetooth scanner already paired results in the keyboard appearing any time the app is expecting input.
  • To pair a Bluetooth scanner to your mobile device, please refer to your mobile device or Bluetooth scanner's instruction manual on how to pair with an Android or iOS device in HID mode.
  • Enabling HID Scanning from the pull-out Menu is a temporary, session only, setting, which is not saved upon logout. Enabling HID scanning from the Settings tab, located at the bottom right of the Home screen, saves that setting to X Dispatch and persists that setting for all future login sessions.

Step-by-step guide

  1. Pair your Bluetooth scanner to your device.
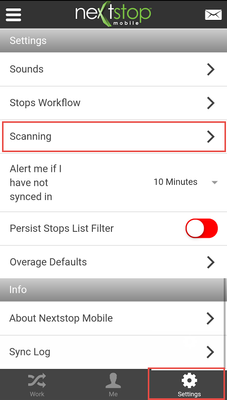
  2. Navigate to the Settings tab at the bottom right of the Home screen.
  3. Select Scanning.

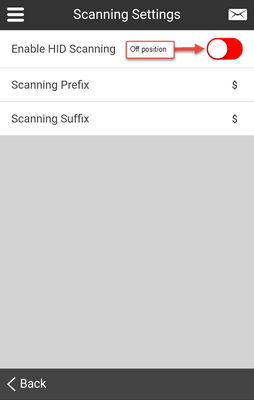
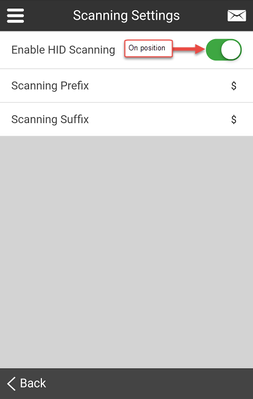
  4. Select Enable HID Scanning to toggle the switch from red (off) to green (on).
  5. Set the Prefix and Suffix if you have set your Bluetooth device to something different than the default in NS.
    • Bluetooth scanning devices typically add a prefix and suffix to a scan to indicate the start and end of a scan. Please refer to your scanner's owner's manual to determine what the prefix and suffix are for your device.
  6. Once HID scanning is enabled use the Bluetooth device to scan your parcels.


Related pages